How do I set up reward options?
You can design it so that supporters can choose the color·size and other options for rewards, or you can design a set-configuration reward.
Learn how to set up reward options that best suit your reward.
Go to Option Setup (click to navigate)
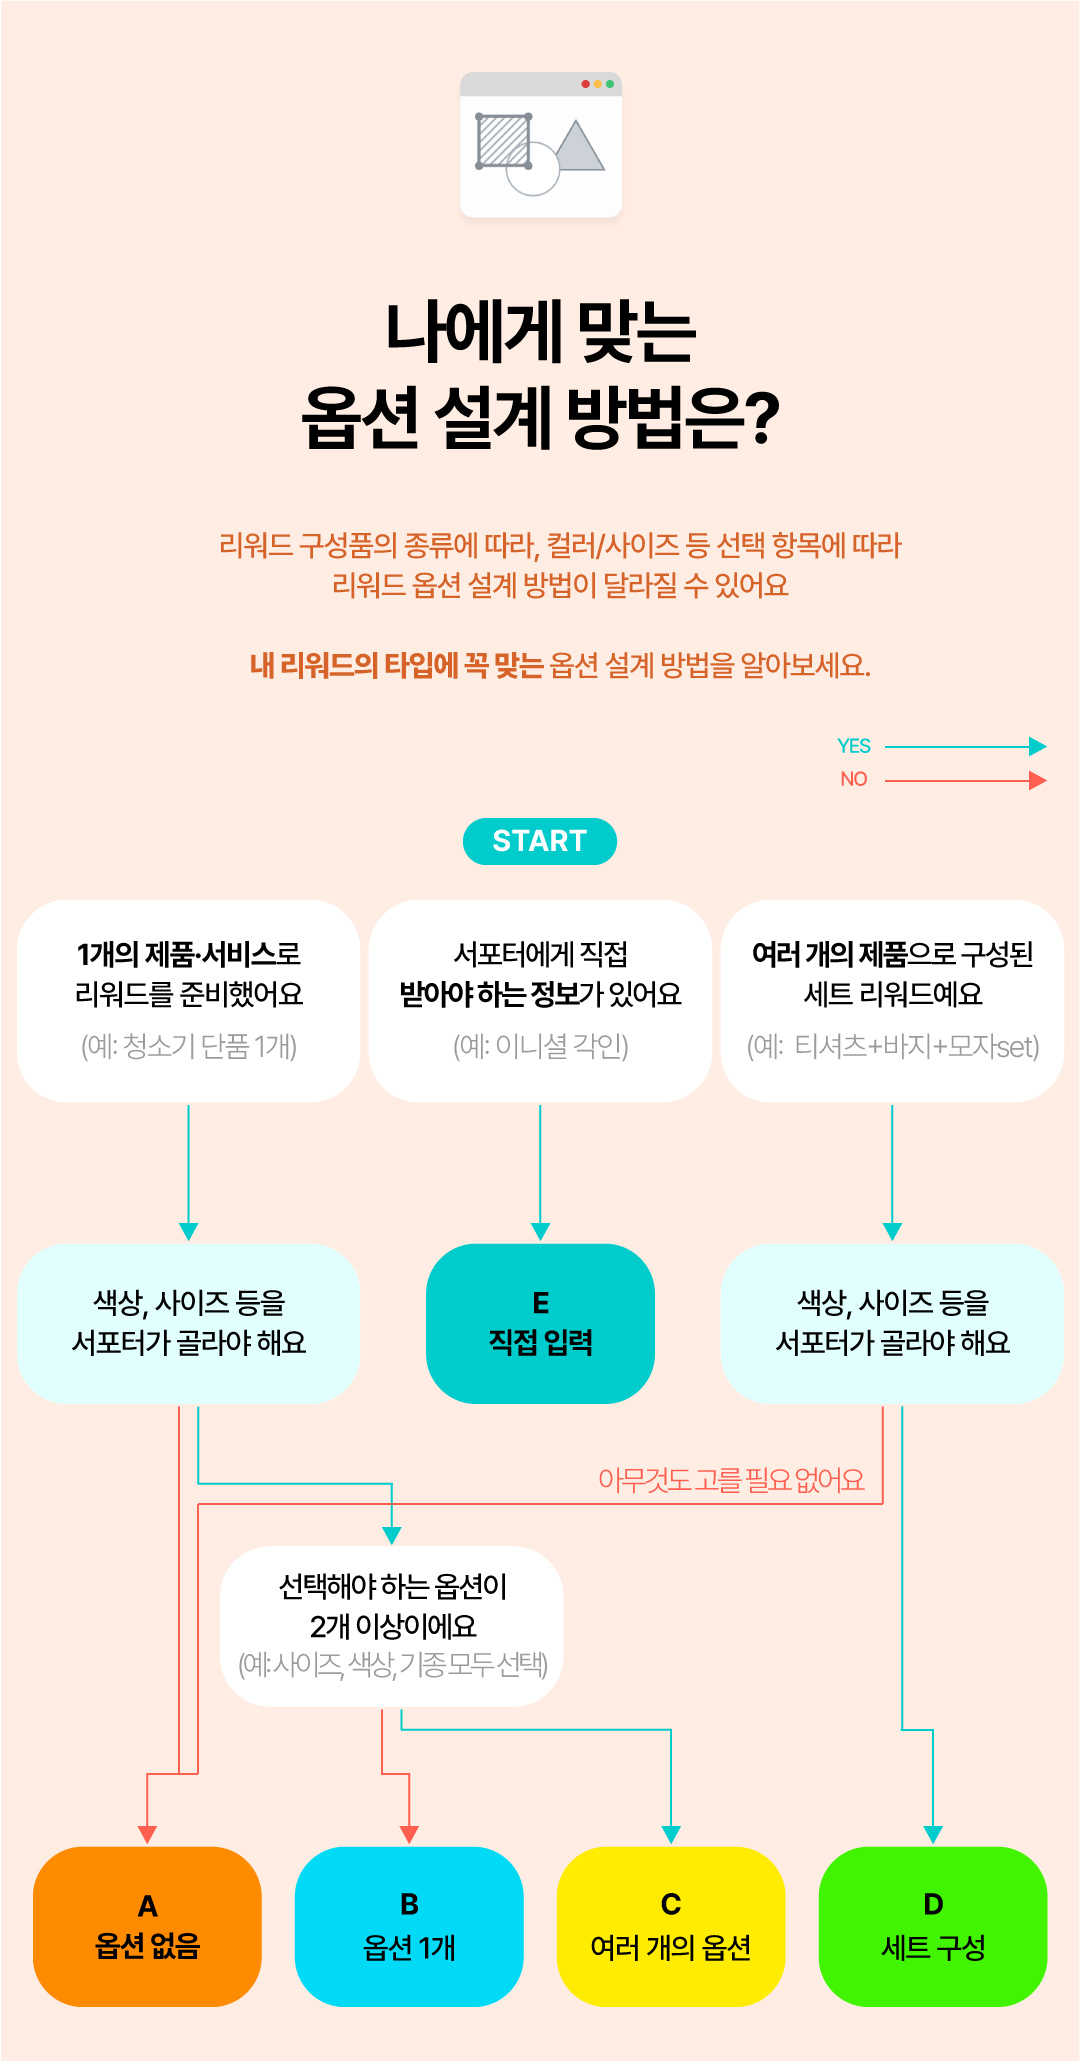
A. When there are no options
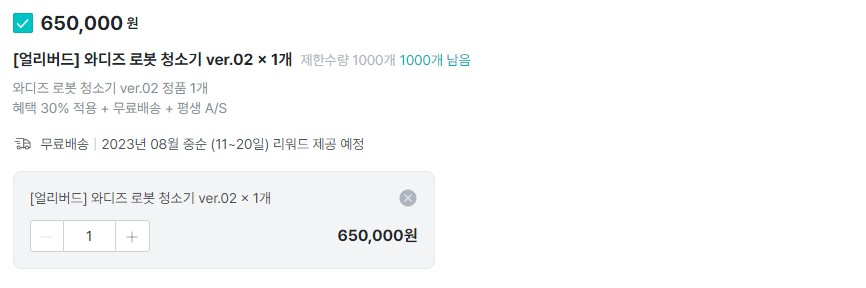
The reward consists of products with no options to choose
- Recommended for tech & electronics projects that prepare rewards as a single high-end item, and for beauty/food/home & living category projects that plan a set with multiple products without options.
- If you select no option, an option selection window will not appear for supporters either.
| Reward examples |
|---|
| Example 1: Robot vacuum cleaner main unit x 1 Example 2: [Whitening Set] Whitening Ampoule 2 + Cleansing Foam 1 + Sleeping Pack 1 Example 3: [Variety Pack] Beef topping 1 + Chicken topping 1 + Vegetable & mushroom topping 1 |
| Reward selection screen preview |
|---|
 |
How to set up
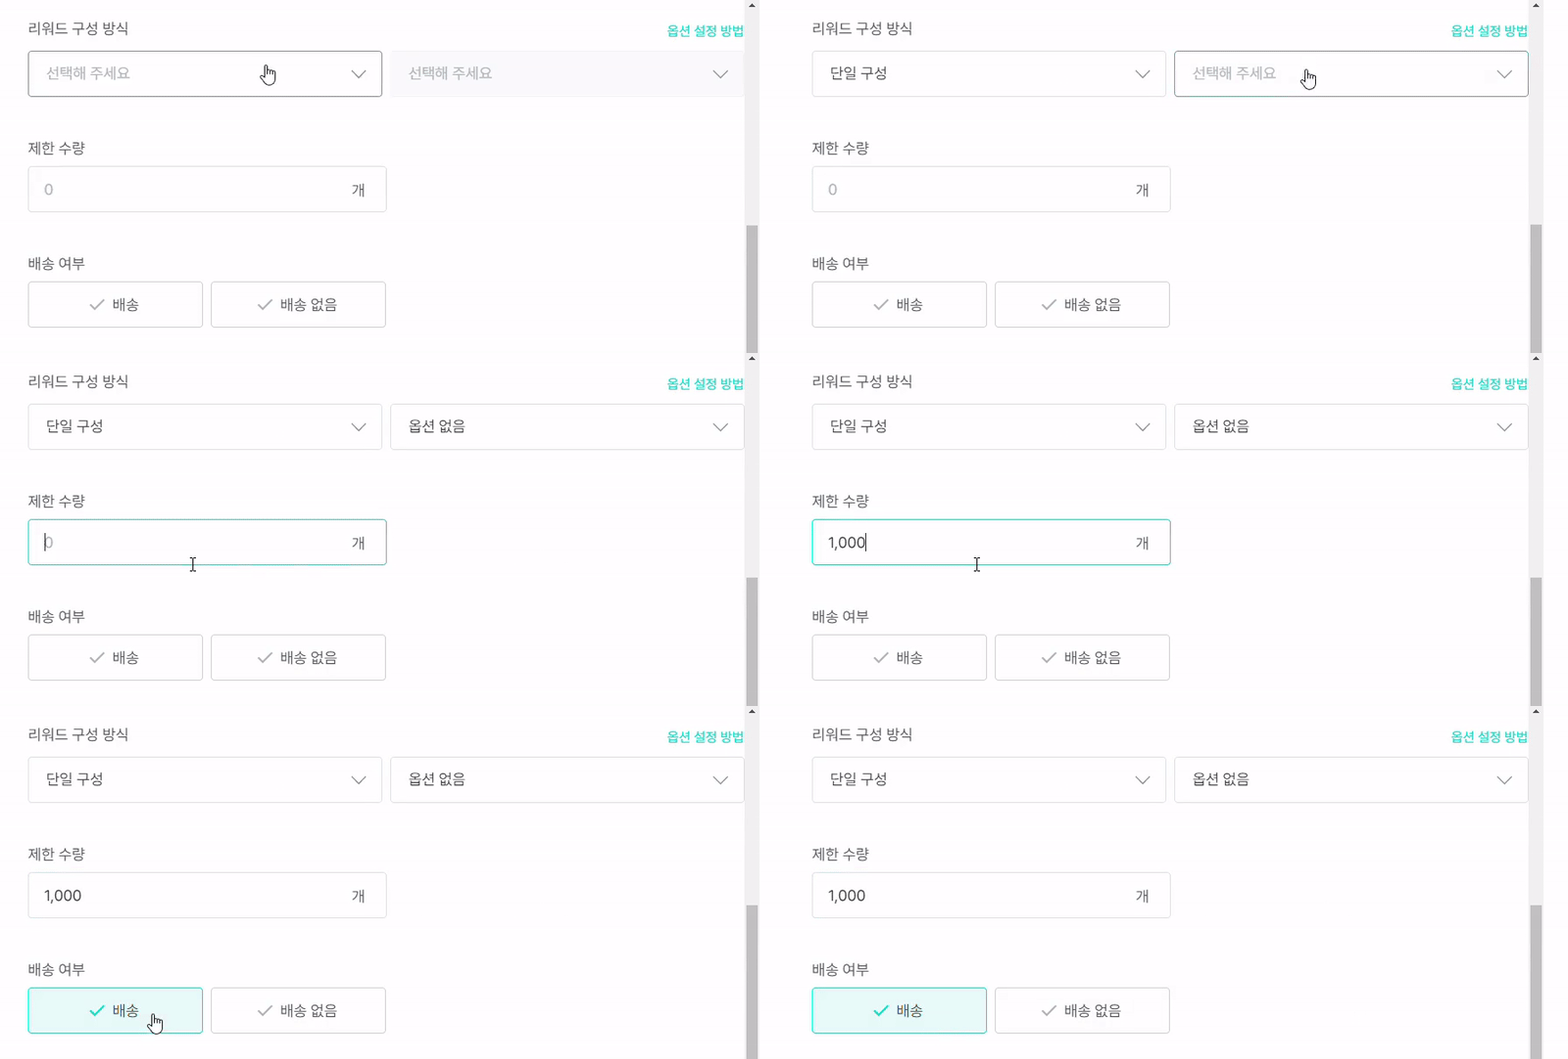
- Add Reward > Reward configuration type > Single configuration > No option and select it.
- Enter the limited quantity for the reward.
 |
※ Once the reward design is complete, click [Save] at the bottom, return to the reward design menu, and click [Preview] in the upper right to make sure the options have been set up correctly. Rewards cannot be modified after the project opens.
B. When there is 1 option
The reward consists of 1 product, and there is 1 type of option to choose
- This is a commonly used approach in the home & living category where you need to choose the color of a reward.
- It is convenient because inventory can be managed per option, and supporters can also easily select the option for the product they want.
| Reward examples |
|---|
| 28-inch premium carrier x 1 Color: Choose 1 from White / Silver / Dark Green / Black |
| Reward selection screen preview |
|---|
 |
How to set up
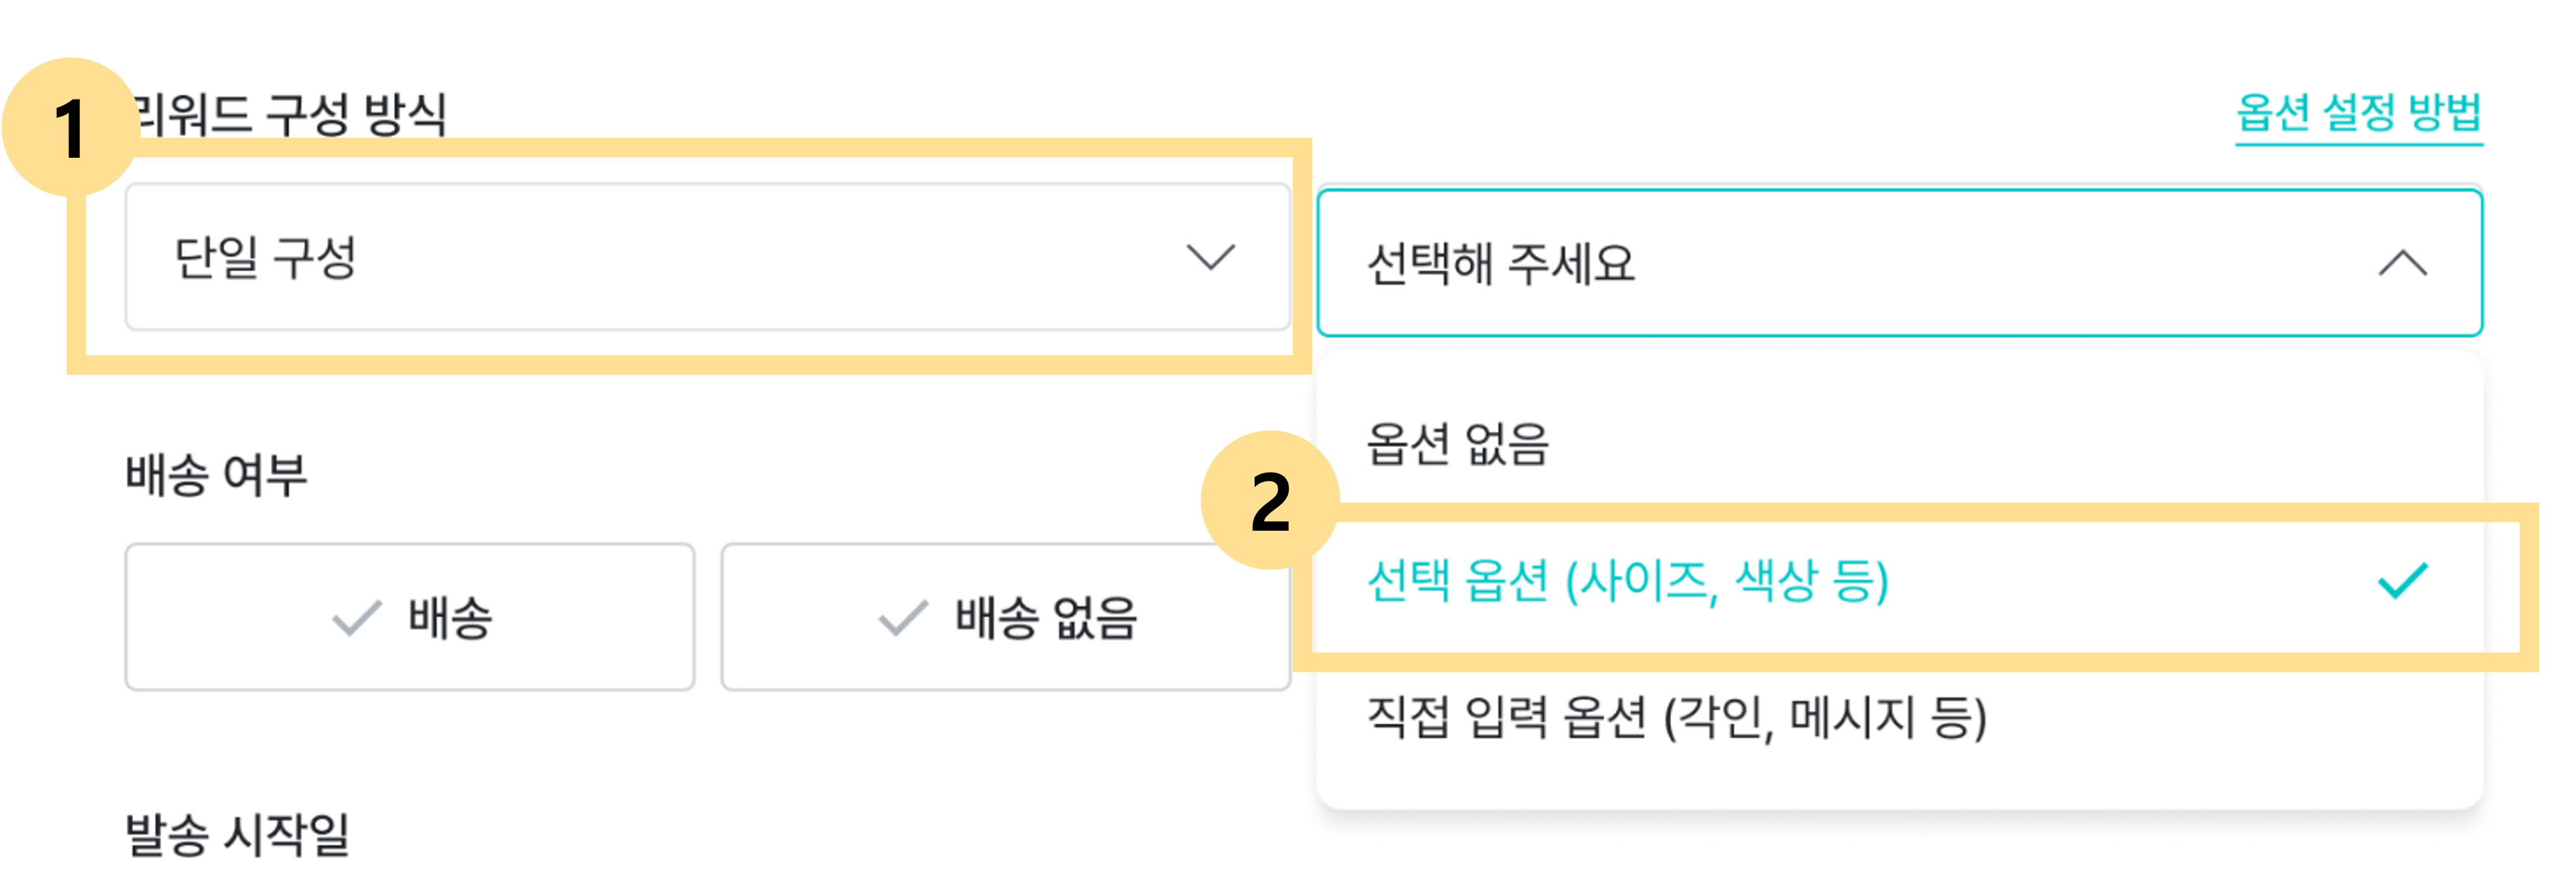
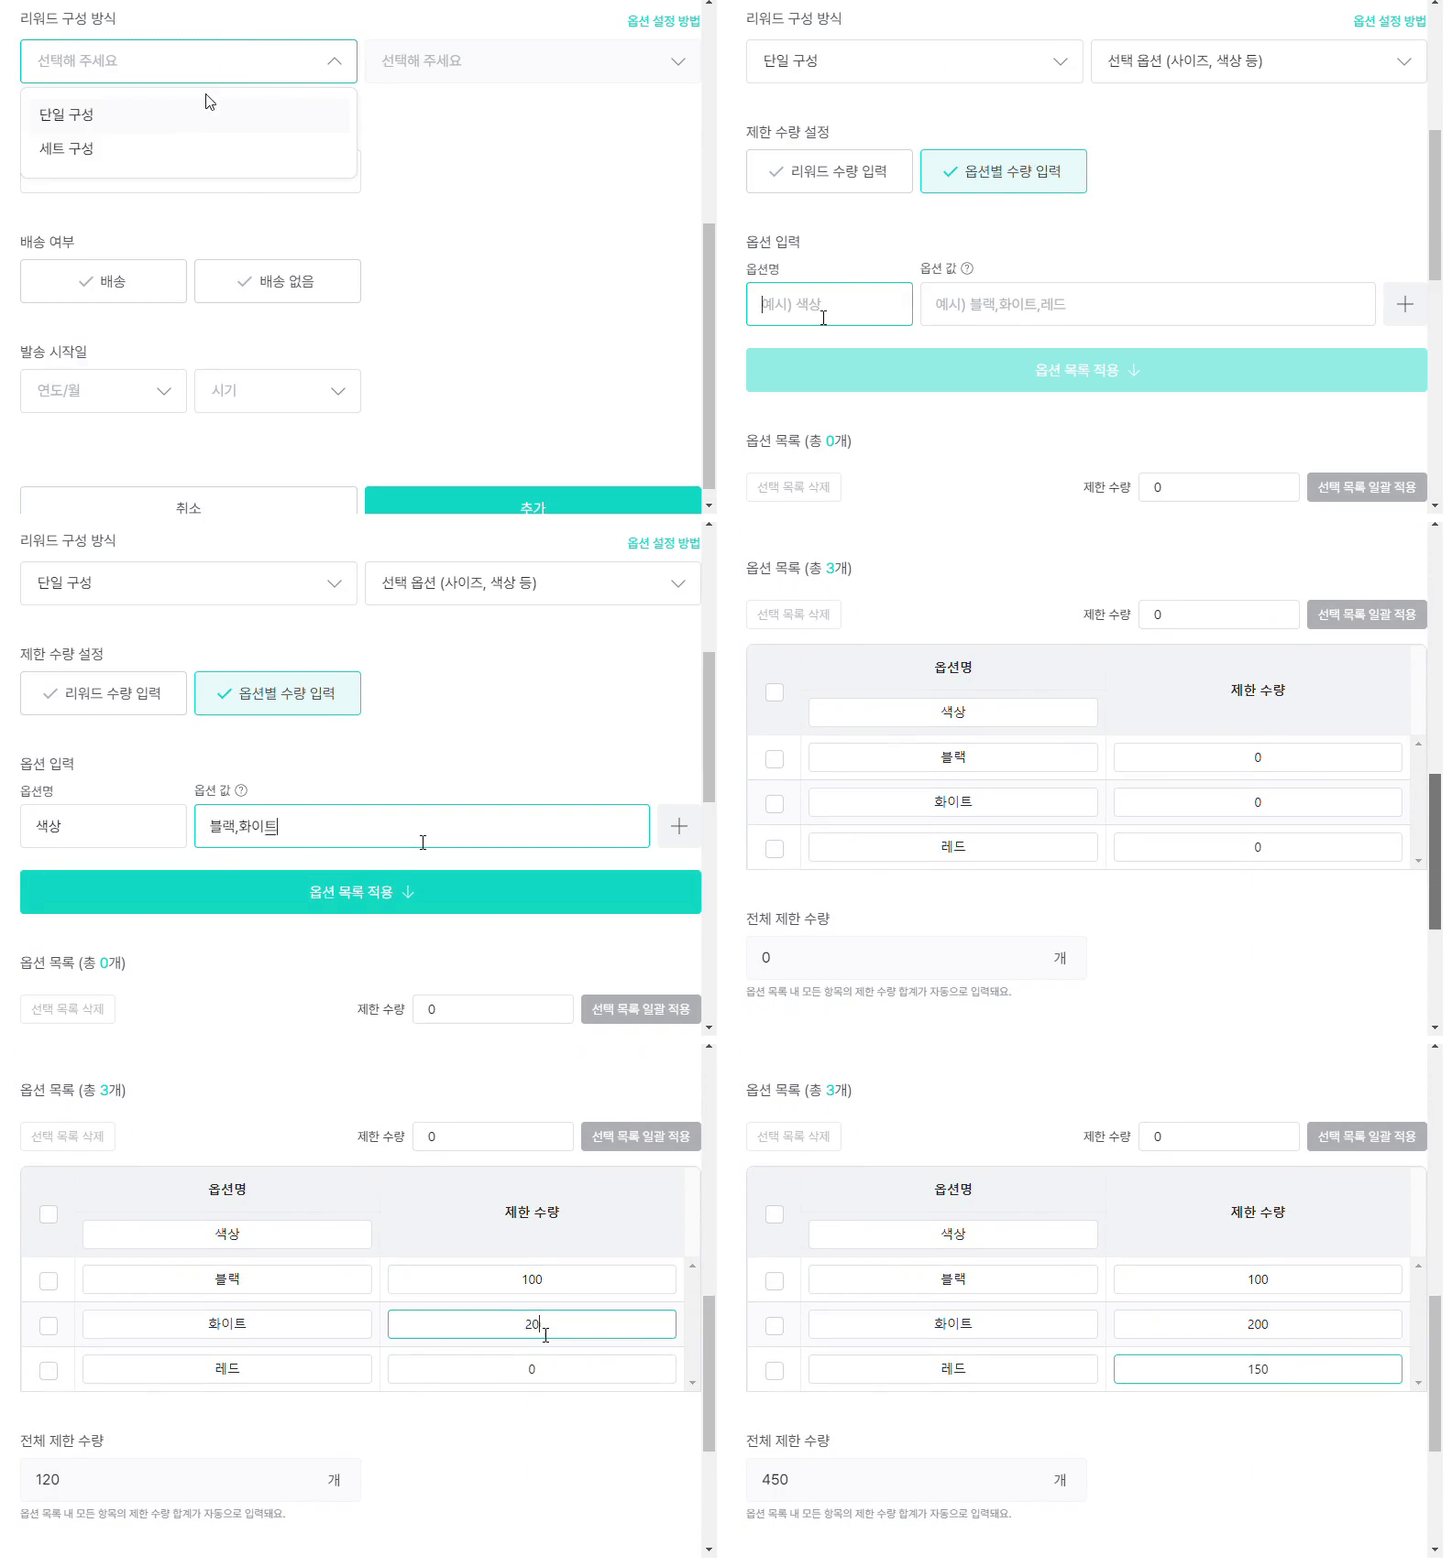
1. Add Reward > Reward configuration type > Single configuration > Selection option and select it.
 |
2. Selecting [Enter quantity per option] allows you to set limited quantities per option. (e.g., you can set 100 units for the white carrier and 500 units for the silver carrier)
3. In [Option name], enter the name of the option that supporters need to choose. (e.g., Color)
4. In [Option value], enter the types of options. Separate option values with commas (,). (e.g., if you can choose 1 color from White, Silver, Dark Gray, Black → enter White,Silver,DarkGray,Black)
5. [Apply option list] Press the button to automatically display the list of options you entered. You can directly enter the quantity for each option here.
 |
※ Once the reward design is complete, click [Save] at the bottom, return to the reward design menu, and click [Preview] in the upper right to make sure the options have been set up correctly. Rewards cannot be modified after the project opens.
C. When multiple options need to be designed
The reward consists of 1 product, and there are multiple types of options to choose
- This is a commonly used approach in the fashion & accessories category where you need to choose both color and size at the same time
- It is convenient because inventory can be managed per option, and supporters can also easily select the option for the product they want.
| Reward examples |
|---|
| Cashmere trench coat x 1 - Color: Choose 1 from Black / Khaki / Ivory - Size: Choose 1 from S / M / L / XL - Length: Choose 1 from Long / Medium / Short |
| Reward selection screen preview |
|---|
 |
How to set up
1. Add Reward > Reward configuration type > Single configuration > Selection option and select it.
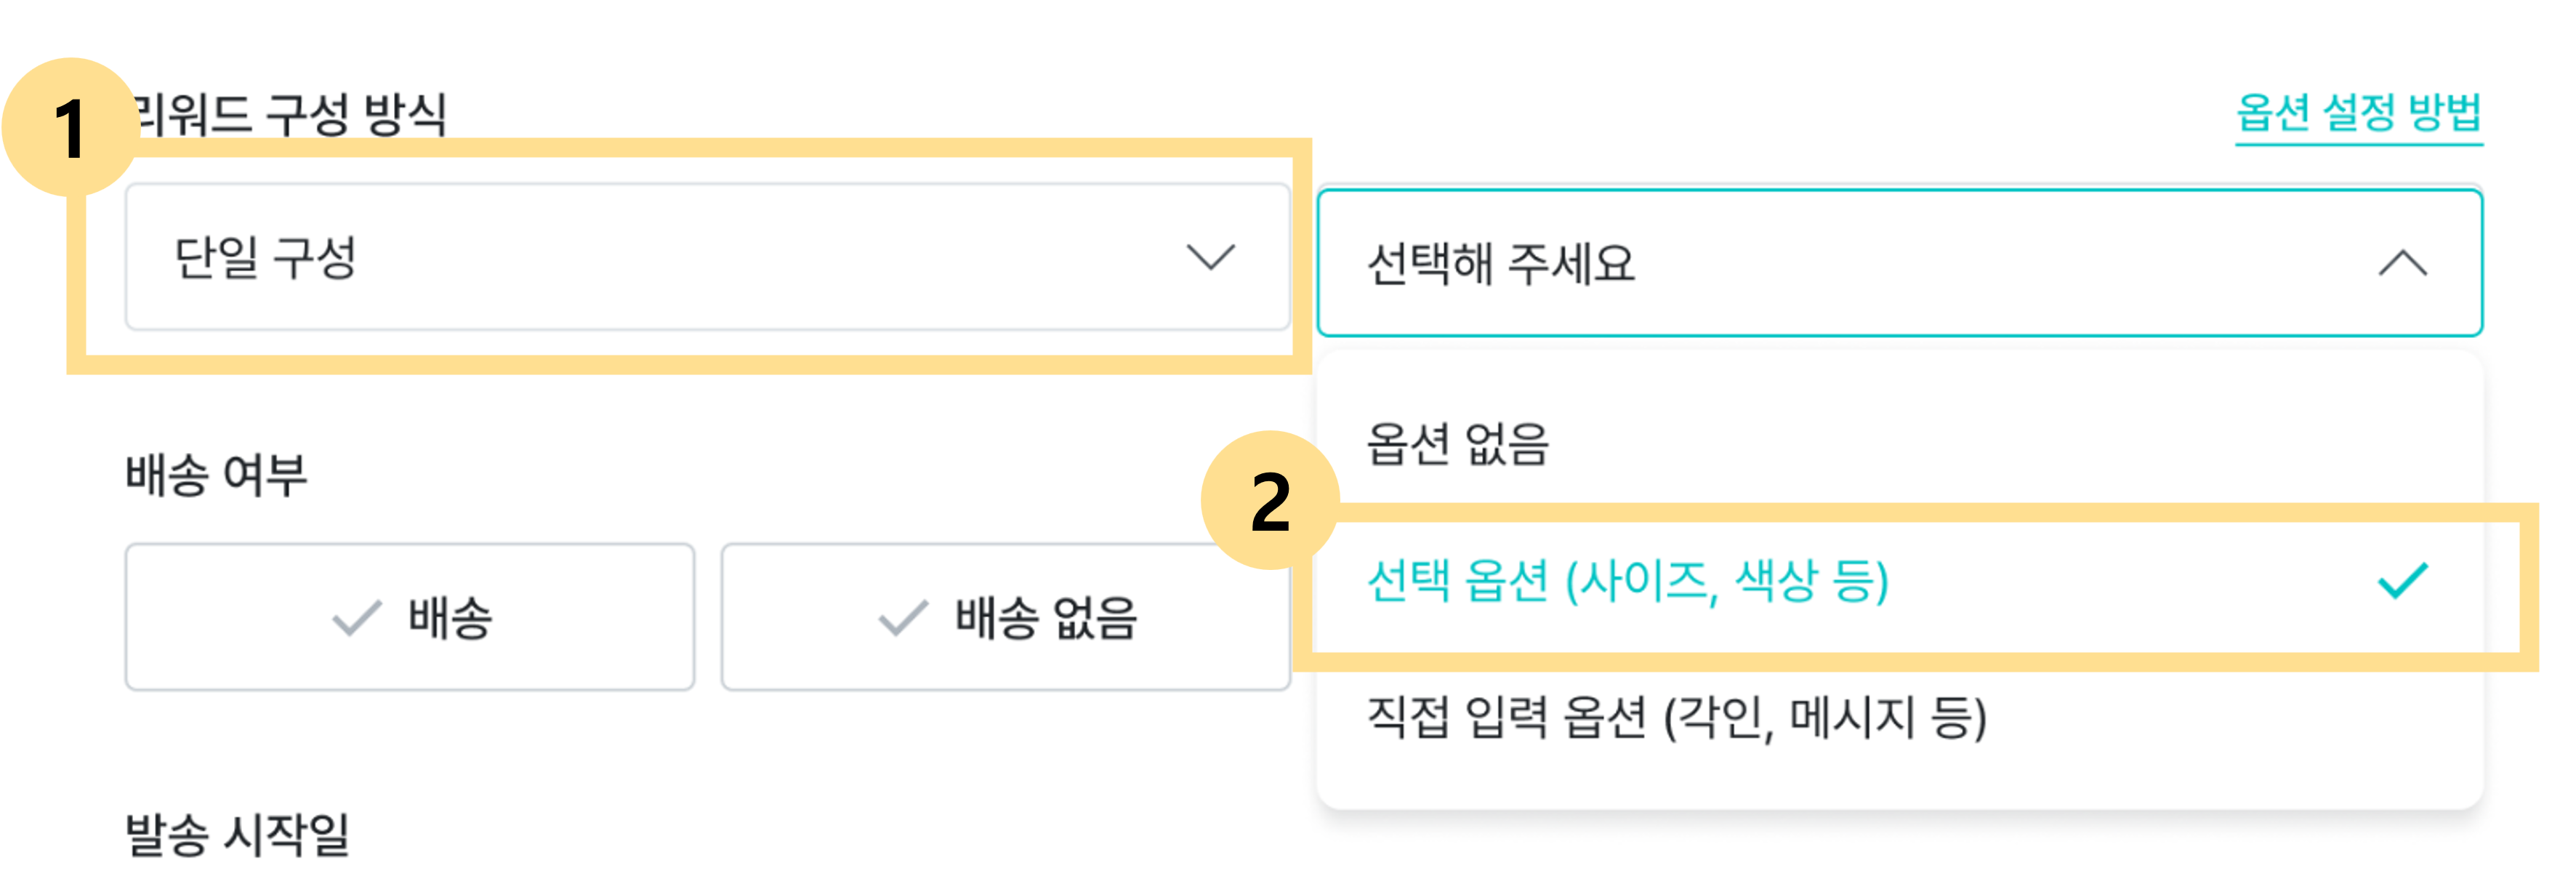 |
2. Selecting [Enter quantity per option] allows you to set limited quantities per option. Please use this if inventory varies by size, color, etc.
3. In [Option name], enter the name of the first option that supporters need to choose (e.g., Color)
4. In [Option value], enter the types of options. Separate option values with commas (,). (e.g., if you can choose 1 color from White, Silver, Dark Gray, Black → White,Silver,DarkGray,Black enter)
5. Press the [+] button on the right to add an option input field. You can add up to 3 levels of options.
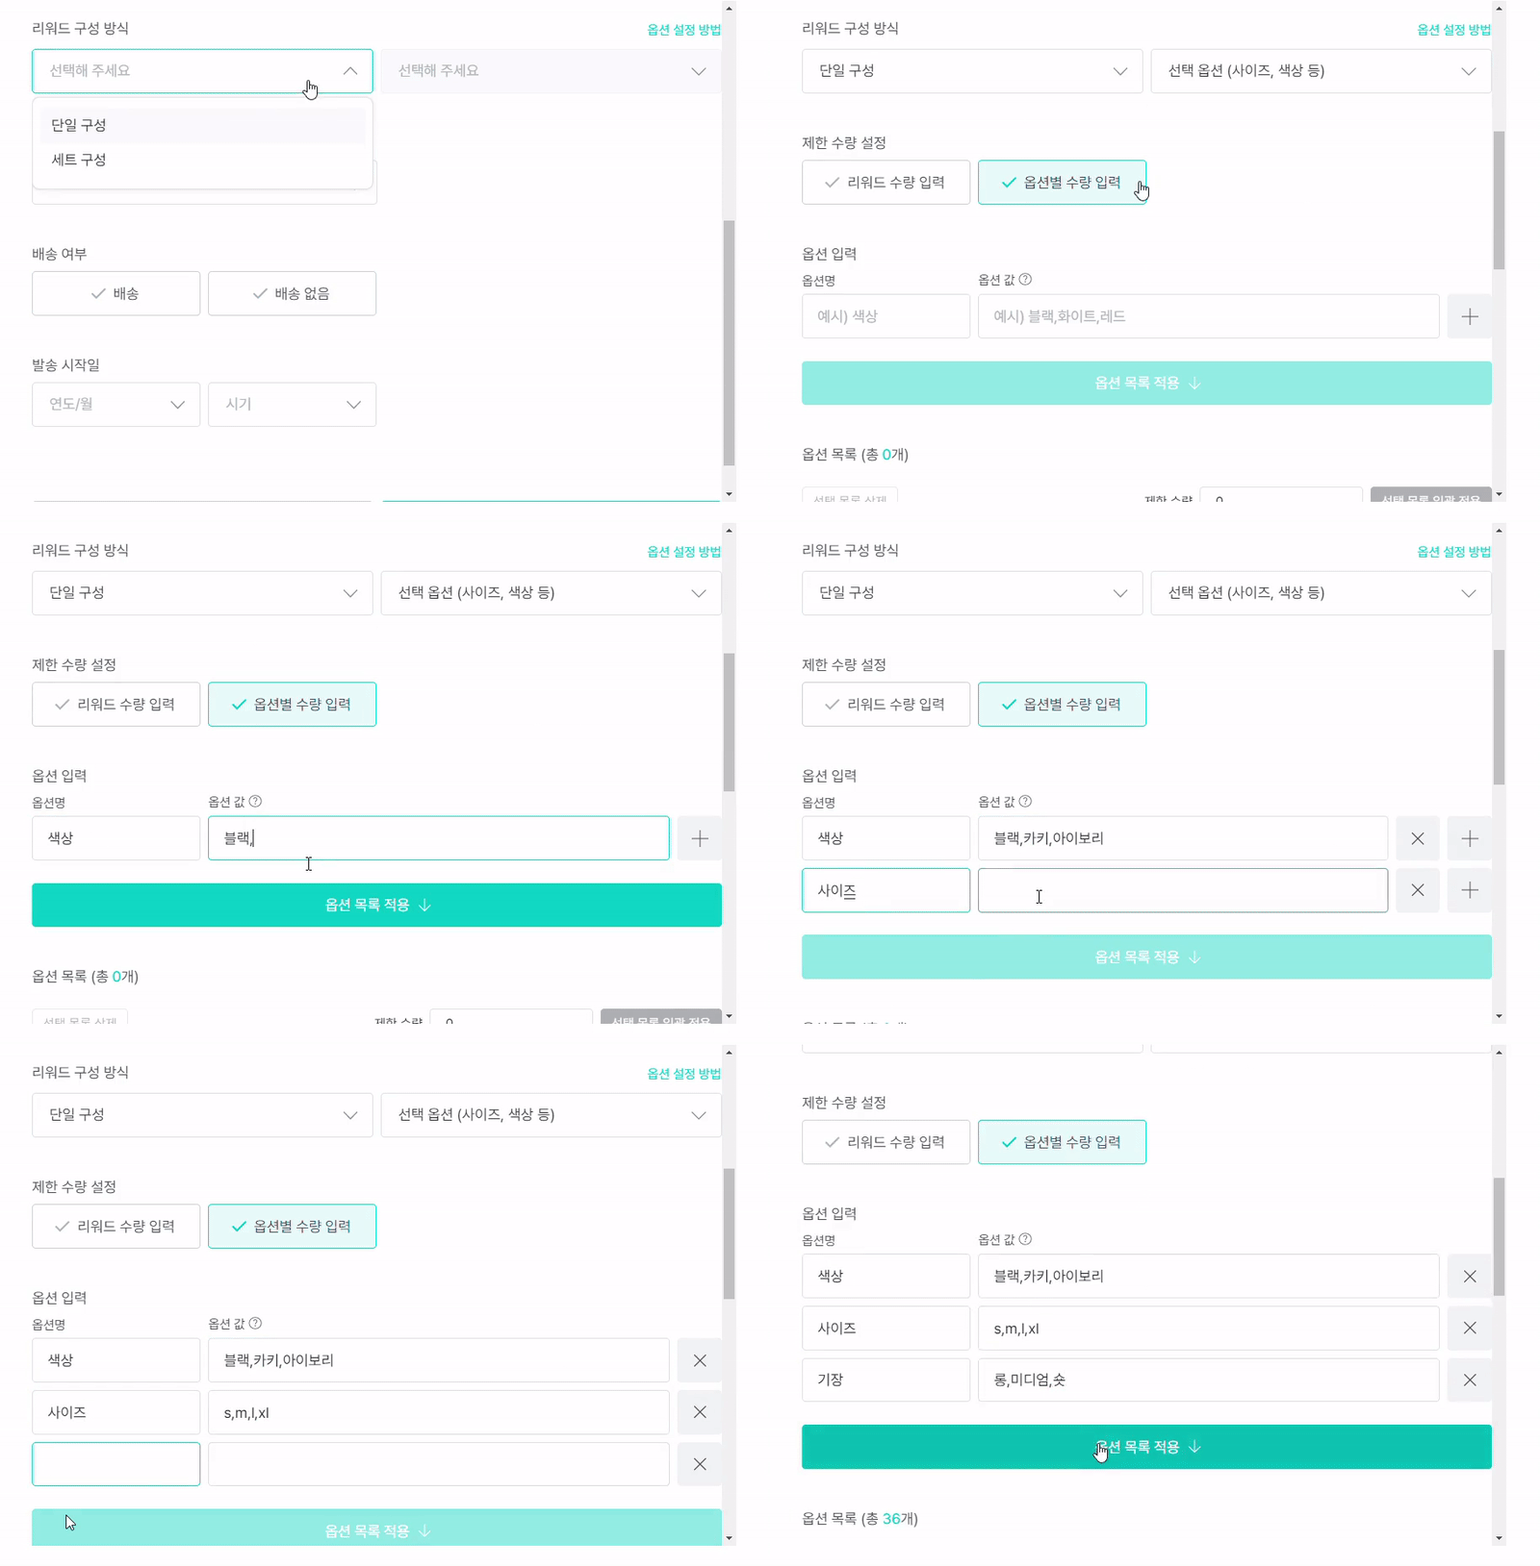 |
6. In the newly added option name field, enter the name of the second option that supporters need to choose. (e.g., Size)
7. In [Option value], enter the types of options.
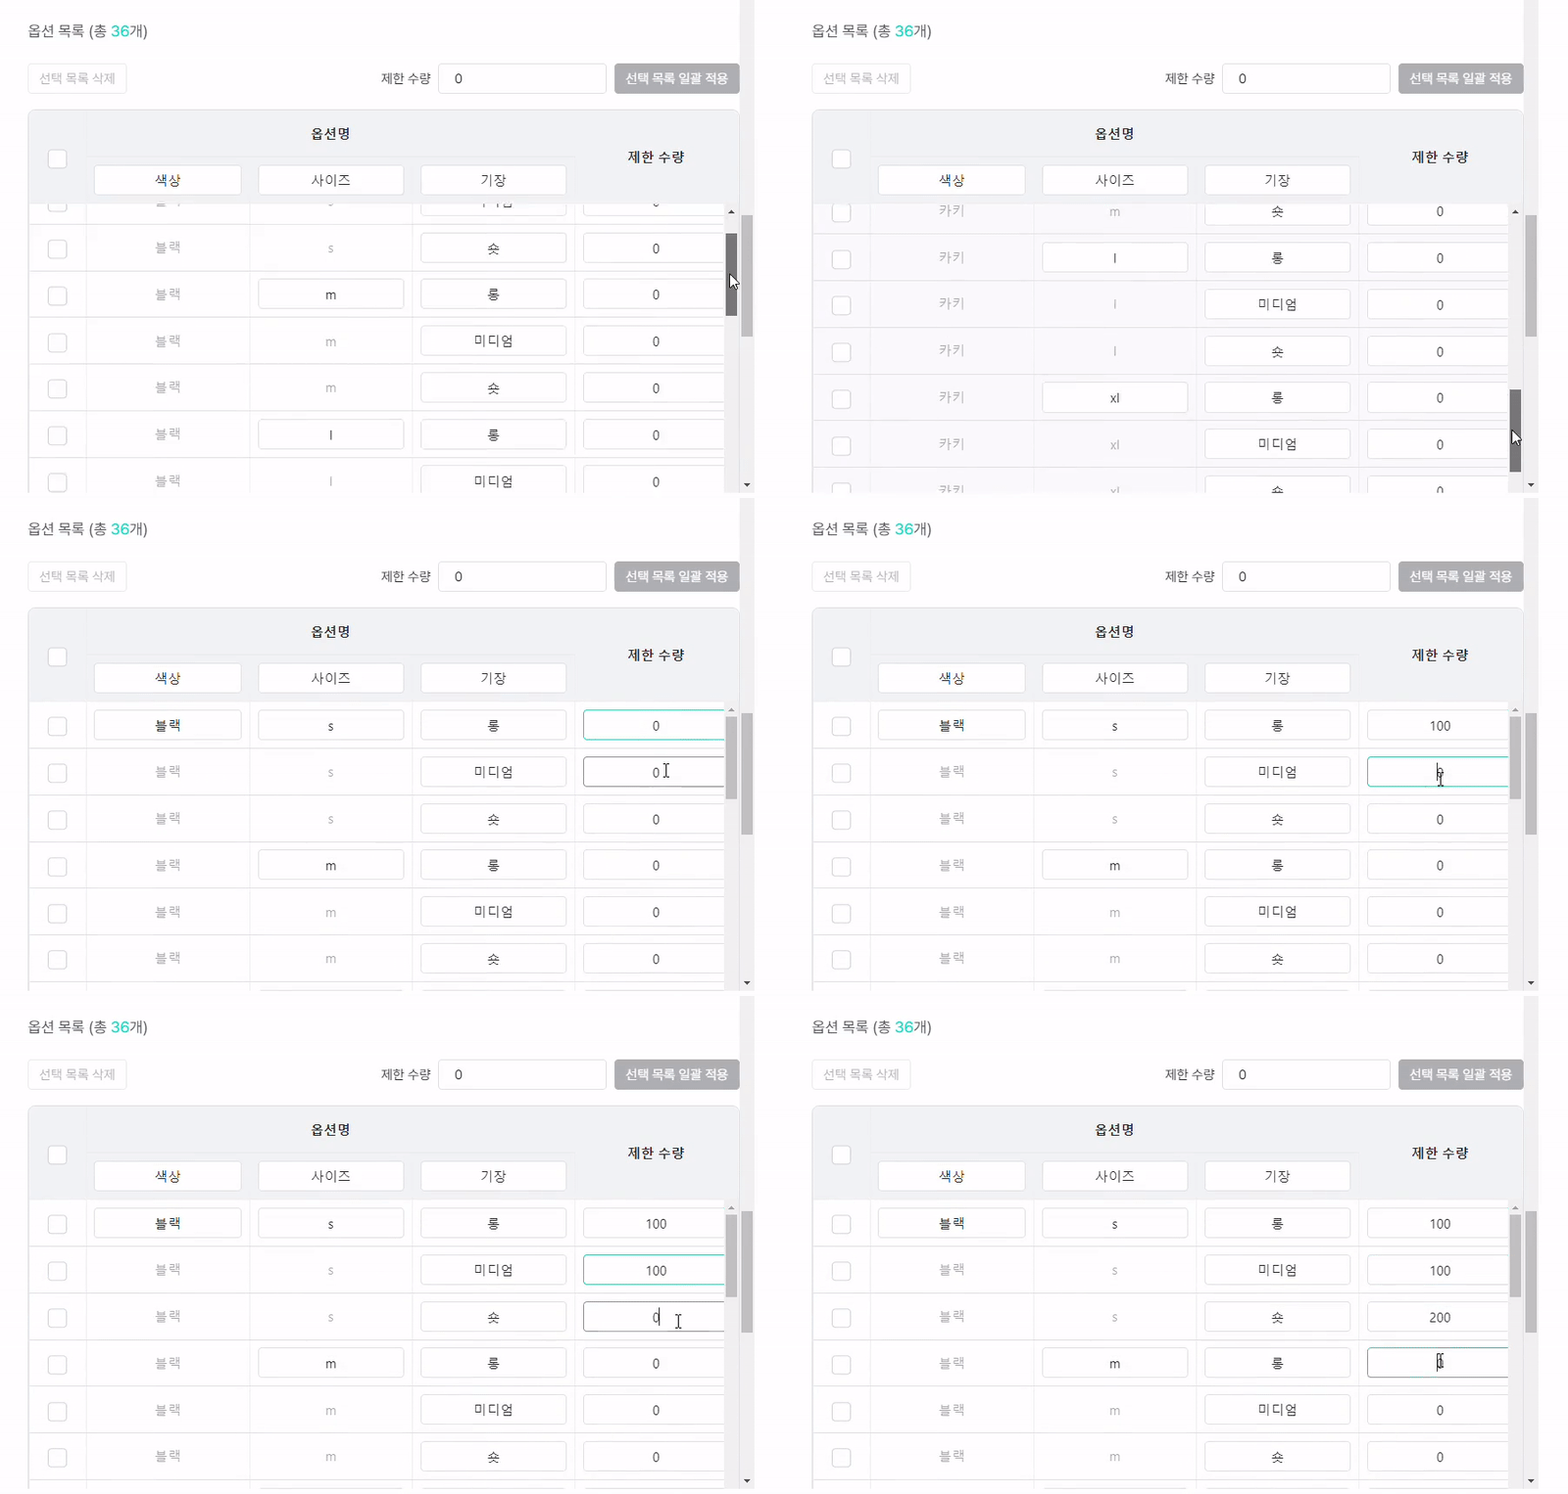
8. [Apply option list] Press the button to automatically display the list of options you entered. You can directly enter the quantity for each option here.
 |
※ Once the reward design is complete, click [Save] at the bottom, return to the reward design menu, and click [Preview] in the upper right to make sure the options have been set up correctly. Rewards cannot be modified after the project opens.
D. When it is a set-configuration reward
Each product in the set has an option to choose
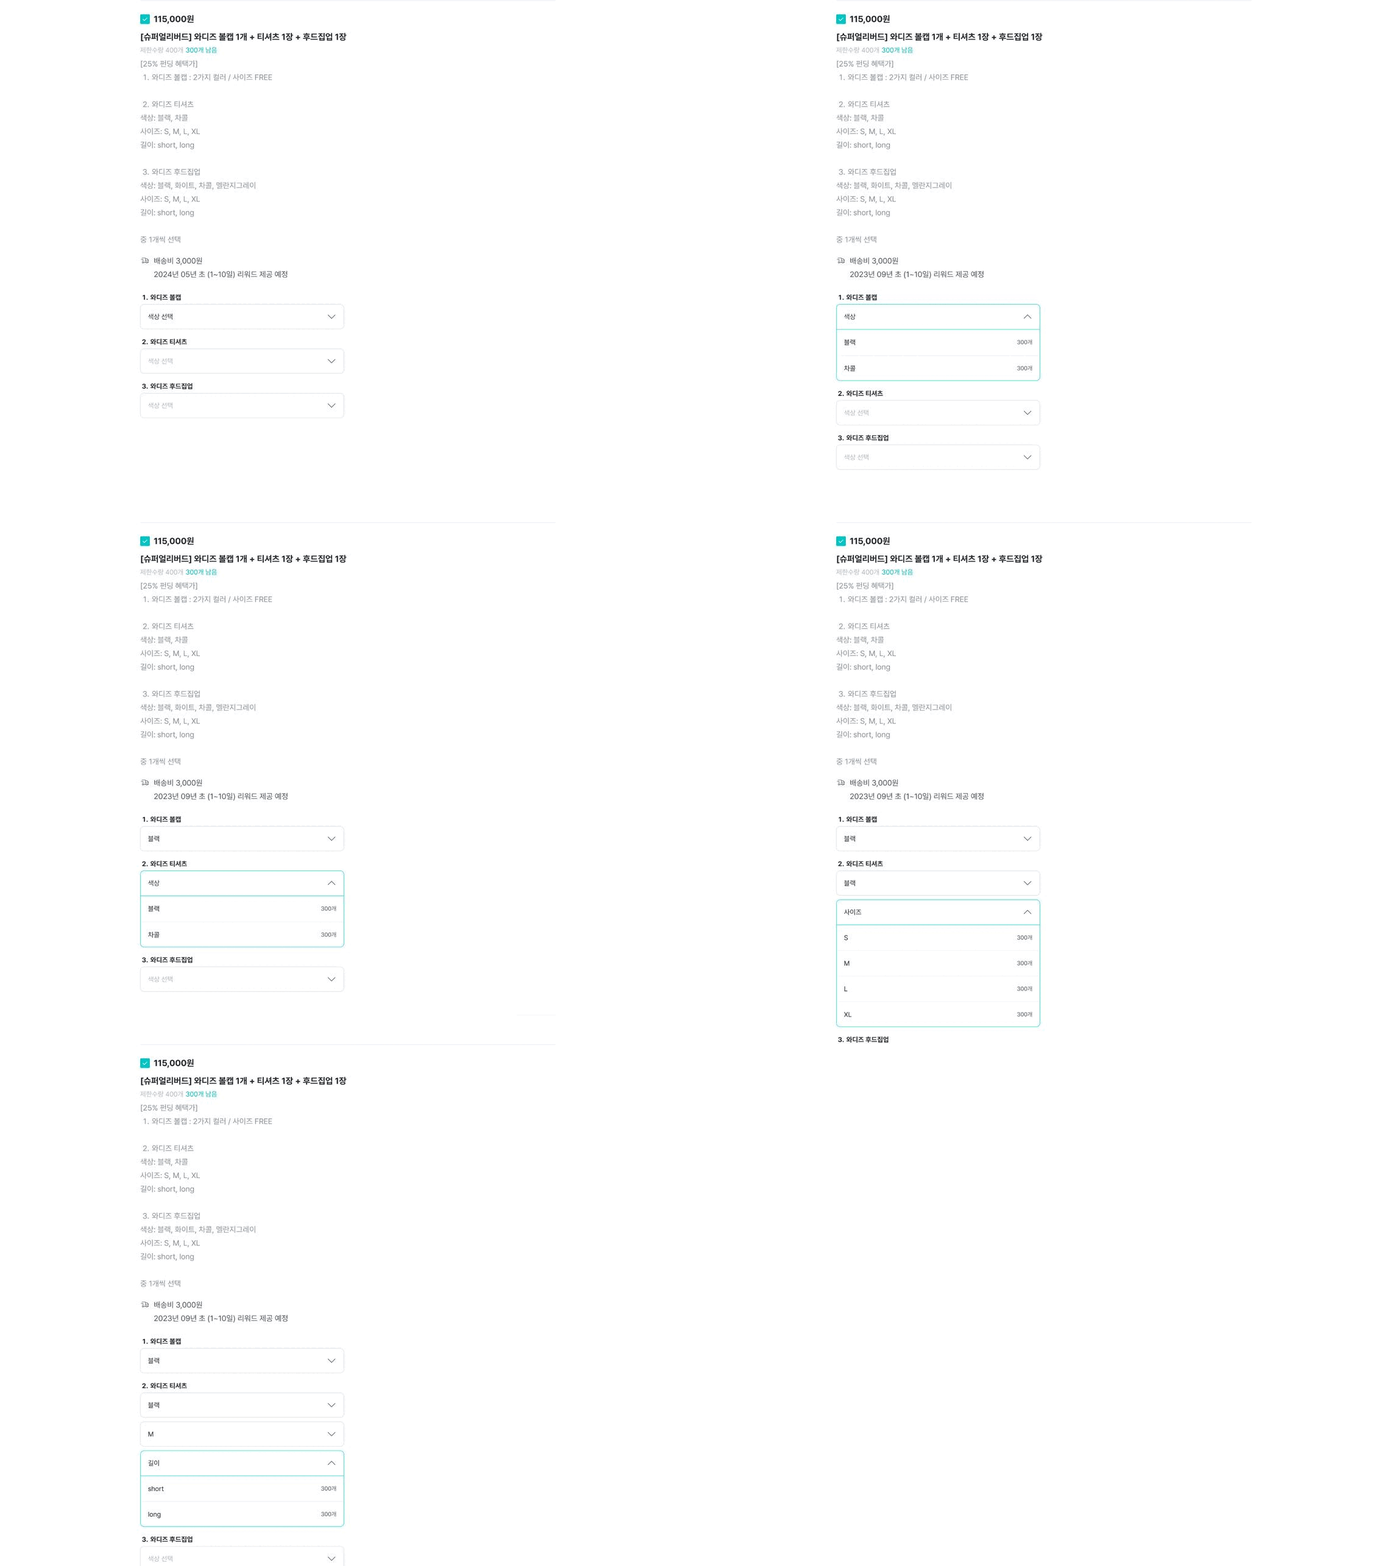
- Use this for set configurations that provide multiple products with options such as color or size.
- [+ Add configuration] Press the button to add options for each product included in the set.
| Reward examples |
|---|
| Example 1: The [Umbrella Set] includes 5 umbrellas in total, and supporters choose the color of each umbrella Example 2: The [Super Early Bird] set consists of 3 items — a T-shirt, ball cap, and hoodie zip-up — each requiring size/color selection |
| Reward selection screen preview |
|---|
 |
How to set up
1. Add Reward > Reward configuration type > Set configuration and select it.
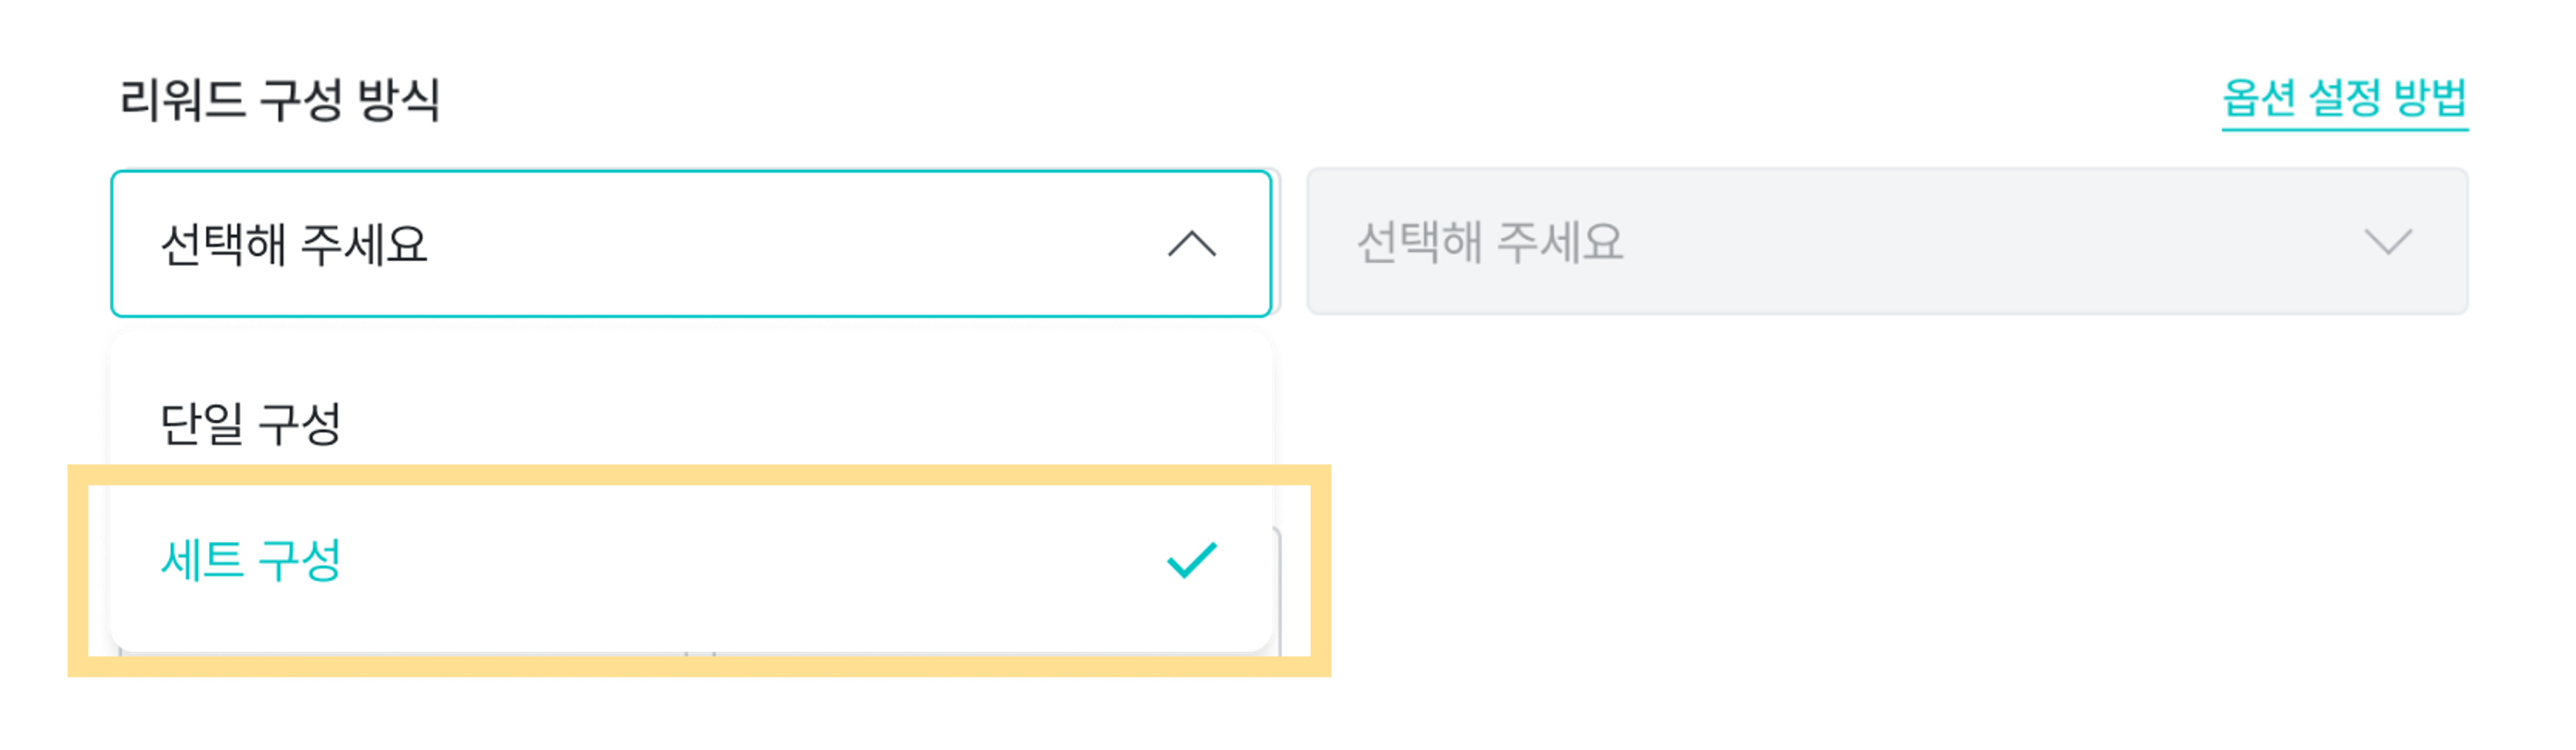 |
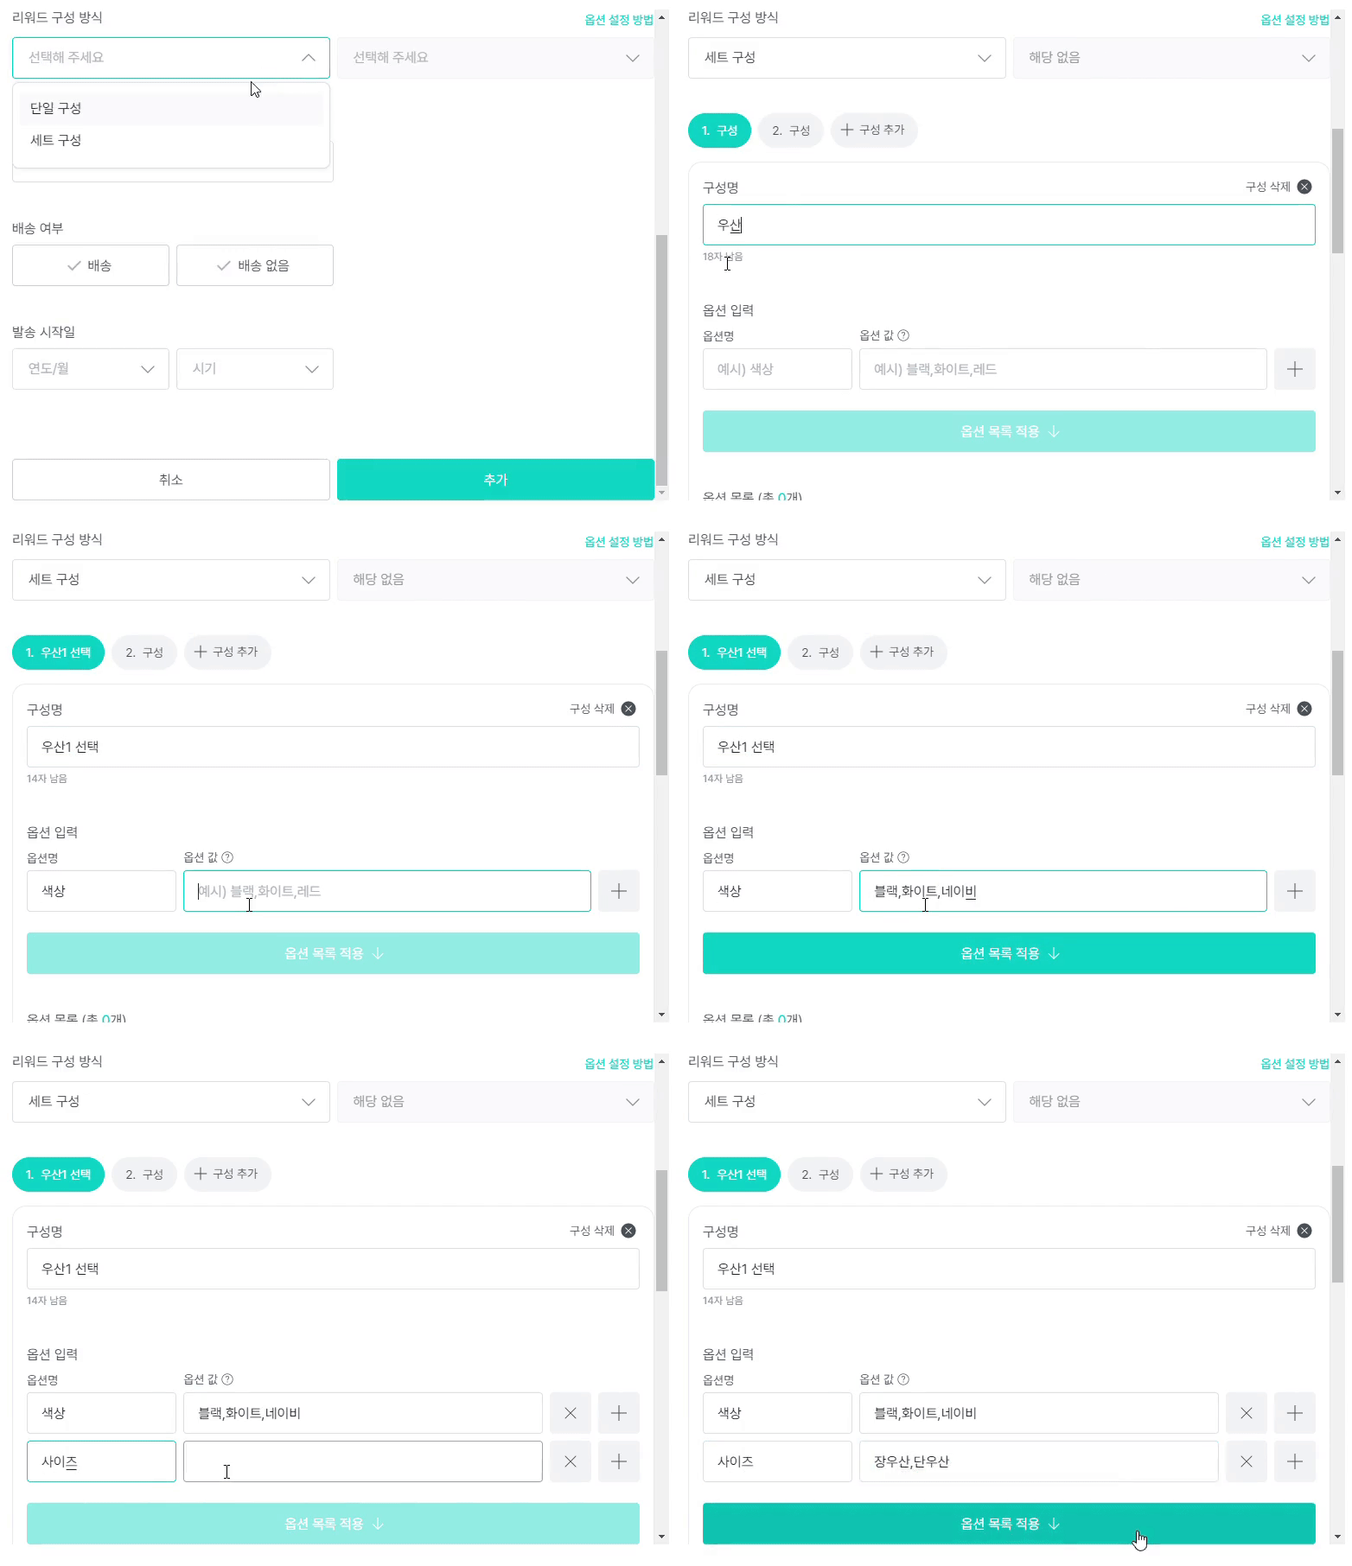
2. Select [1. Configuration], then enter the configuration name and options. (e.g., Select first umbrella)
3. The method for entering options is the same as
- In [Option name], enter the name of the option that supporters need to choose
- In [Option value], enter the types of options. Separate option values with commas (,).
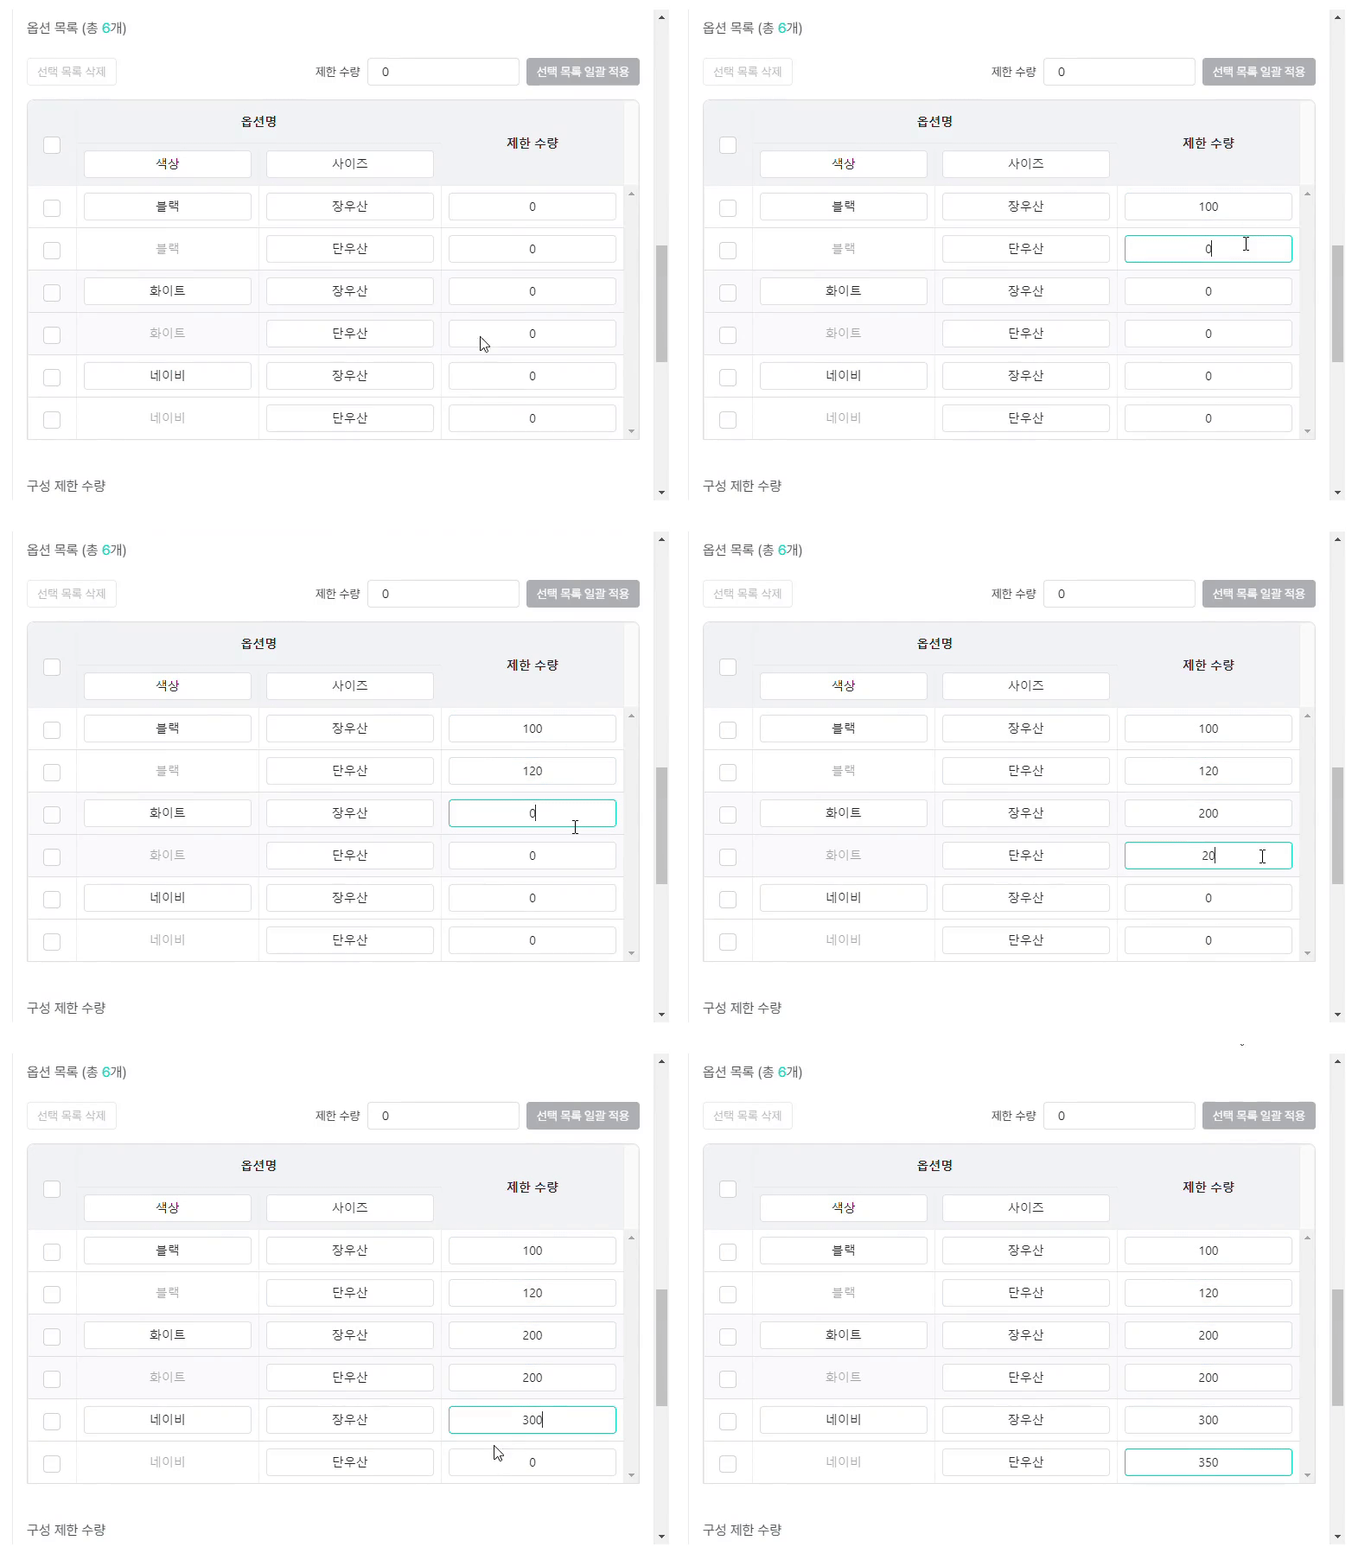
- [Apply option list] Press the button to automatically display the list of options you entered, and you can enter the quantity for each option.
4. Select [2. Configuration] and use the same method to enter all rewards and options included in the set. You can enter up to 10 configurations using [+ Add configuration].
 |
 |
※ Once the reward design is complete, click [Save] at the bottom, return to the reward design menu, and click [Preview] in the upper right to make sure the options have been set up correctly. Rewards cannot be modified after the project opens.
E. When there is information that must be collected directly from supporters
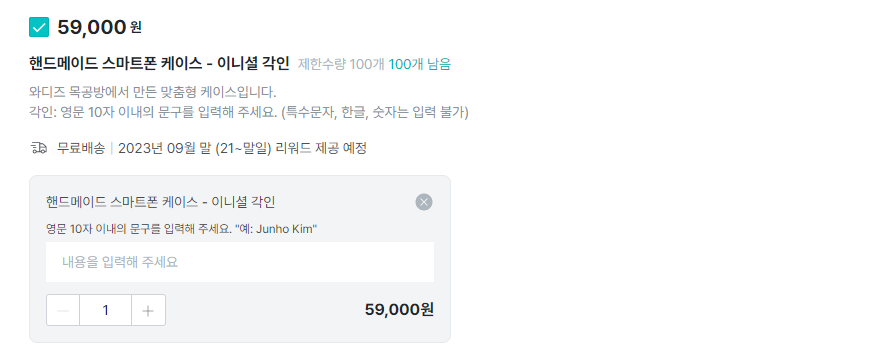
- A field for supporters to enter their reward requests will appear.
- Use this when there is information that supporters must enter directly, such as personal messages or initial engravings.
| Reward examples |
|---|
| Handmade smartphone case - initial engraving |
| Reward selection screen preview |
|---|
 |
How to set up
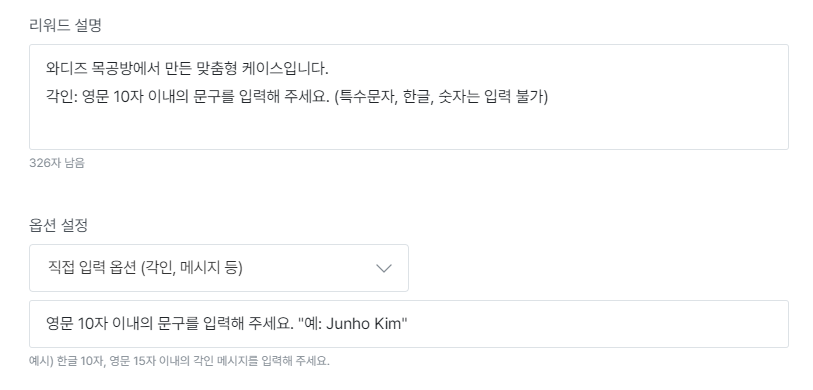
- Add Reward > Reward configuration type > Single configuration > Direct input option and select it.
- Please write a guide message in the field created below the option settings. You may also enter an example that supporters can read and follow.
(e.g., "Please enter a phrase within 10 English characters.)
 |
※ Once the reward design is complete, click [Save] at the bottom, return to the reward design menu, and click [Preview] in the upper right to make sure the options have been set up correctly. Rewards cannot be modified after the project opens.