[Product Page Photography Tip #2] How to Take Product Photos Using Only a Smartphone
Be sure to keep this in mind!
- I’ll share some great tips for taking high-quality photos using the resources you have on hand.
- You can make the product the star of the shot with a clean background and relevant props.
- By making good use of lighting and shadows, you can create a three-dimensional effect for your product.
Just by using the background and props effectively,
you can achieve studio-quality results.
It would be great if you could shoot your products in a studio with a professional, but that’s not always possible. In cases like this, focus on the backgrounds and props you already have. By making the most of your current situation, you can take photos that look just as professional.
Creating a Clean Background
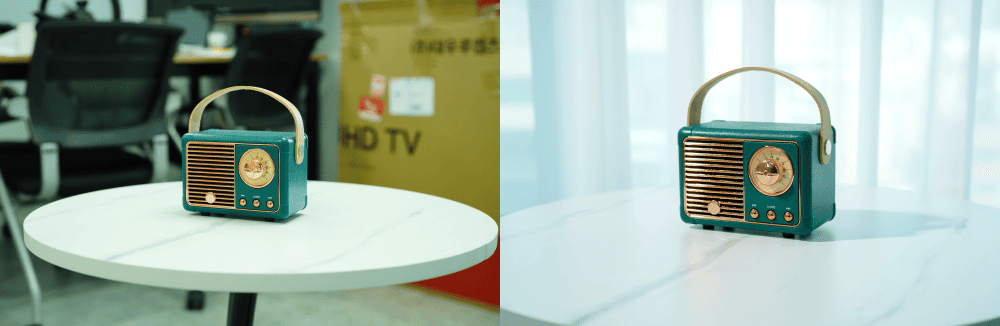 No matter how well your product looks, it’s hard to use a photo if a blurry office scene is visible in the background. In this case, it’s best to place your product in front of a white wall. Alternatively, a wall covered in plain wallpaper or the front of a curtain works well too. One important point to note here is that you should keep the product at least 20–30 cm away from the wall.If you place it right upagainst the wall, shadows will form, and the background will be in focus as well, which can make the image feel cluttered. If you frequently take product photos, you can purchase thick white cardstock from a stationery store and tape it to the wall and table to create a clean background.
Subtle Prop Placement
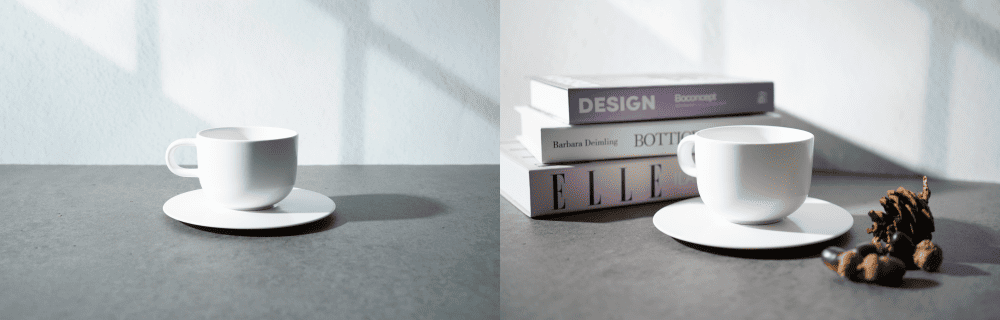 Why not try arranging props that are somewhat related to the product? You don’t necessarily have to buy anything just for props—anything you have inyour office orhome can serve as a prop.For example, if you’re photographing a coffee cup, placing a small leaf or a book next to it can create a warm and cozy atmosphere. For cold drinks, adding ice to the cup can enhance the refreshing vibe. However, too many props can actually distract from the main subject, so always remember that the product itself is the star of the show.
The King of Lighting: Sunlight
The ultimate source of lighting is natural light. Simply being outdoors in a sunny spot or near a window where sunlight streams in beautifully can bring your photos to life. Ultimately, you need sufficient light to capture natural-looking photos. While direct sunlight provides plenty of light, it can be too harsh, so I recommend using the soft sunlight that filters through a window.
Of course, if you’re shooting directly facing the window, the intense light from the window can cause the product to be backlit ,making it appear darker. Therefore , it’s best to position yourself at a 45-degree angle to the window so that the product receives ample light.Diffusing the light through a sheercurtain or shooting on a day when natural light is soft is ideal. This creates soft shadows on the product, resulting in a natural look.
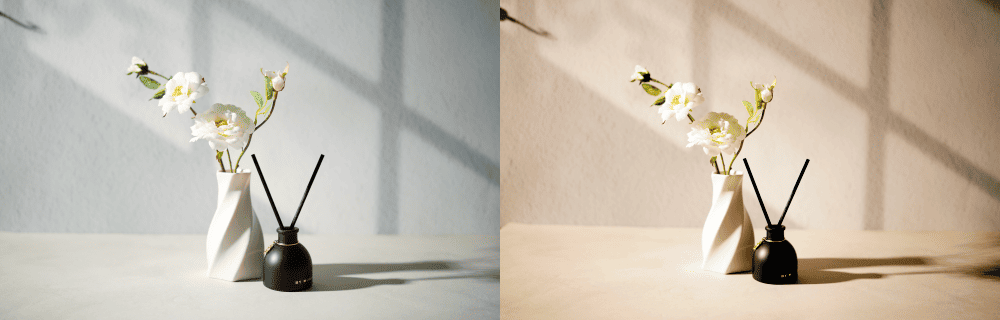 (Left) Sunlight color around 11:00 AM–1:00 PM / (Right) Sunlight color after 4:00 PMOne important point to note is that you need to carefully observe how sunlight changes over time.Even in the same location,the amount and angle of sunlight can vary depending on the time of day and the orientation of the window. Additionally, before sunset, the sunlight tends to be more yellow, which often makes it difficult to achieve the desired atmosphere. That said, generally speaking, the ideal time for natural light is between 9:00 AM and 3:00 PM.
If you’re new to using lighting, start with continuous light
Are you hesitant about which lights to use and how to set them up? If so, I recommend a continuous light of about 60W with a daylight (white) color temperature and a softbox to ensure sufficient light output. If your space is limited, a simple ring light or desk lamp is also a good alternative. While the direction of the light will vary depending on your desired concept, generally speaking, positioning the light above or to the side of the subject minimizes shadows and highlights the product’s details.
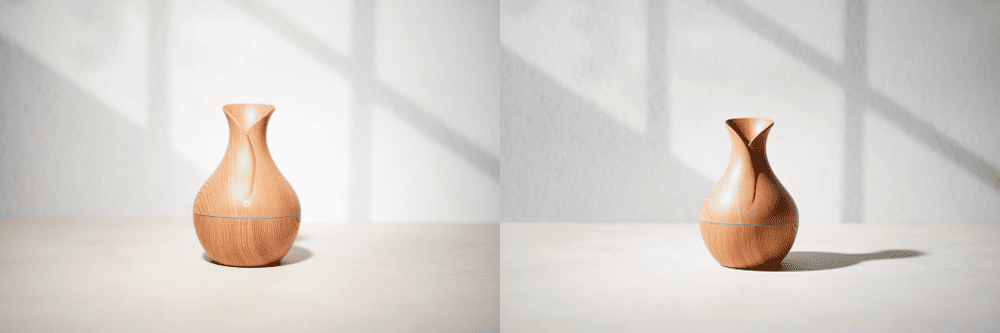 (Left) A strong light source in front results in an overexposed product with no sense of depth /
(Right) Natural shadows and a sense of depth are captured by illuminating the product with overall brightness from a distance
When using continuous light, shadows are inevitable. You’ll need to know how to handle these shadows effectively to achieve natural-looking photos. First, if you place the product too close to the continuous light source, the contrast can become too strong and look unnatural. Therefore, I recommend positioning the light at a distance of at least 1.5 meters, with the intention of illuminating the entire space.
If you need a generally bright setup, you’ll need an additional light source. In fact, when adding lights, using at least two rather than just one can increase the variety of your lighting setups. This is because using continuous light on both sides of the product allows you to illuminate it brightly while minimizing shadows, and positioning lights diagonally behind and in front of the product brightens the entire space while further enhancing the product’s sense of depth.
Our eyes are accustomed to lighting that shines down from above—such as sunlight or indoor lighting—providing strong, wide coverage. Therefore, when setting up your lighting, avoid a spotlight-like setup. Instead, try illuminating the product broadly from above or lighting the entire space. You’ll see that this results in more natural-looking product photos.
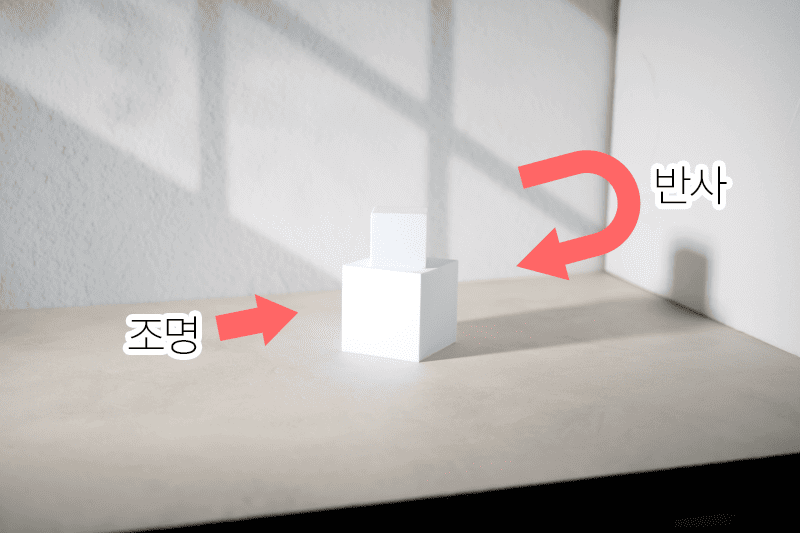
If you have lighting, use a reflector to brighten the shadows
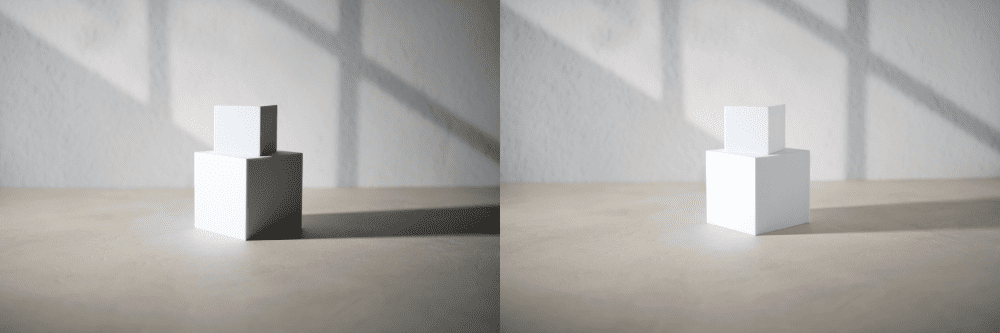 (Left) Contrast when using only a single light source on the left—creating deep shadows (dark areas) on the right /
(Right) Comparison using a left light source and a right reflector—the shadow on the right is appropriately illuminated
 If you’re still getting used to photography or only have a smartphone to work with, simply following the tips above will help you take photos that look completely different from what you’re used to. Once you’ve finished shooting, you’ll need to refine the results. In the next post, I’ll share retouching techniques for turning your photos into professional-quality images.
<Product Photography Tips for Detail Pages> Series
- [Product Photography Tip #1 for Product Detail Pages] How to Take Professional-Looking Photos with Your Smartphone
- [Product Photography Tip #2 for Product Detail Pages] How to Take Product Photos Using Only a Smartphone
 Written byJeon Su-yeon,GenieCloud Editor