[Product Page Photography Tip #3] Photo Editing Techniques That Make Visitors Stop Scrolling
This content is part of
<Product Photography Tips for Detail Pages>
series.
Don't forget to bring this!
- The “post-processing” stage determines the overall quality of your product photos.
- You can improve the quality of your product photos with just basic editing.
- I’ll show you how to achieve that Instagram-worthy look with just tone correction.
Post-processing is what makes a photo complete.
Have you ever taken a photo and felt like something was missing? Of course, there could be various reasons—composition, lighting, settings, and so on—but the biggest reason is actually that the photo hasn’t been “post-processed.” It’s very difficult to create a finished product photo without post-processing. This is because indoor shoots not only lack sufficient light but also make dust and scratches stand out clearly. So today, I’ll talk about editing techniques that’ll turn your photos into professional-quality images.
The First Step: Exposure Correction
The first thing you need to do is adjust the exposure. Even if your photo comes out darker than it was during the shoot, you can easily adjust the brightness through post-processing. However, pixels that have lost their color information and turned pure white (#FFFFFF) cannot be recovered. So, if you haven’t taken the photo yet, I recommend shooting slightly underexposed and adjusting it in post-processing rather than trying to capture a photo that’s too bright. The best approach is to shoot so that details in the brightest part of your frame are visible, and then adjust the shadows. Let’s take a look at an example.
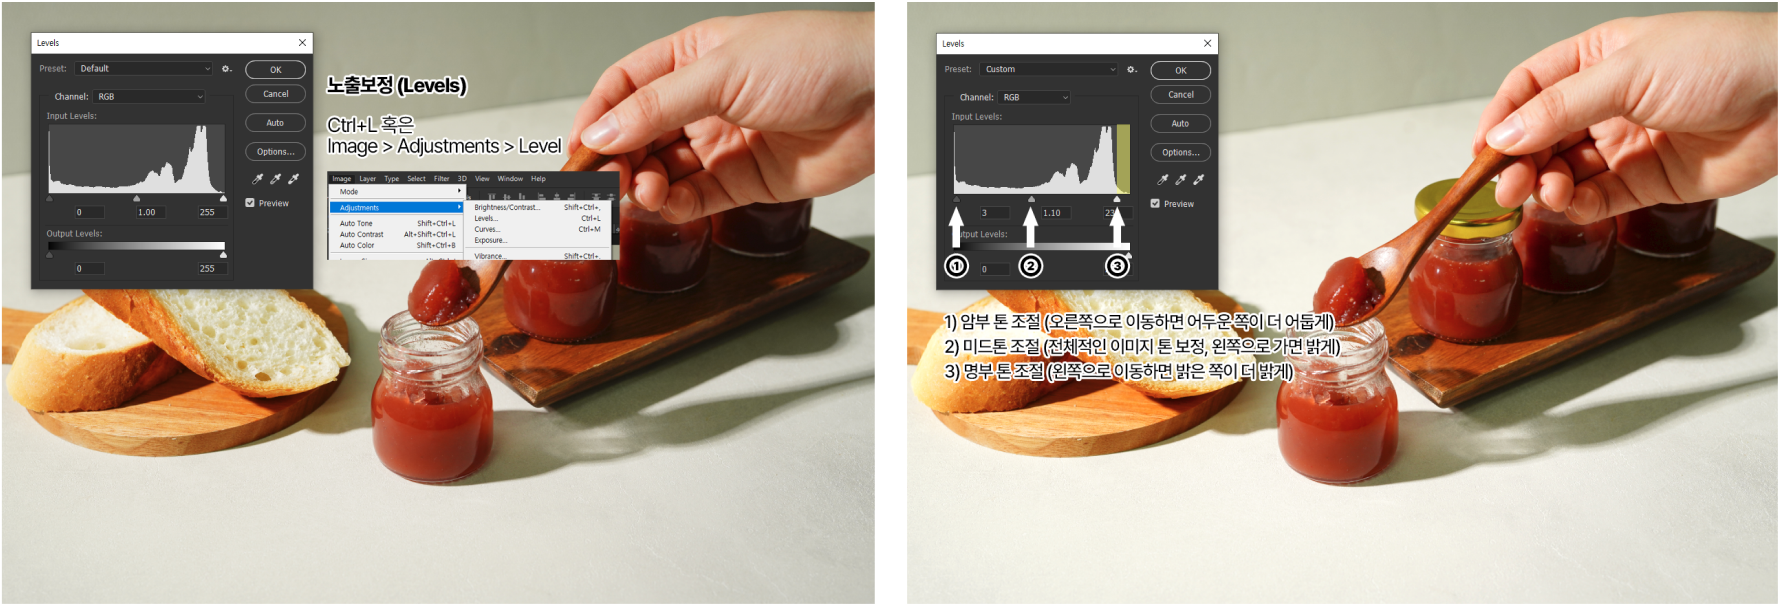
Exposure (Level) adjustment uses a total of three sliders: shadow tone adjustment, midtone adjustment, and highlight tone adjustment. The interfacelooks similar to the one inthe example photo, and adjustments are typically made in the order of 3, 2, 1.
The basic approach is to start by slightly raising the highlights. If you look at the exposure meter, you’ll see very high peaks on the right side, while the area marked in yellow appears flat. If the photo is dark against a bright background, this range becomes wider. Usually, moving the highlights slider all the way to the peak of this wave will bring the image close to the appropriate brightness. After that, check the photo’s tone, slightly increase the midtones, and then adjust the shadows slider slightly to the right to restore the shadows—which may have become unnecessarily bright due to the midtone adjustment—to their original tone.
Tone-Up Adjustments for Vibrant Photos (Brightness, Contrast)
Adjusting the exposure allows you to correct the photo’s brightness to some extent. However, for portraits or photos with stark contrasts, adjusting the brightness and contrast further after exposure correction can create a brighter , more vibrant look or produce a photo with intense contrast. If you need to significantly increase the overall brightness of a very dark photo, lowering the contrast while increasing the brightness can help stabilize the overall tone. Let’s take a look at some examples.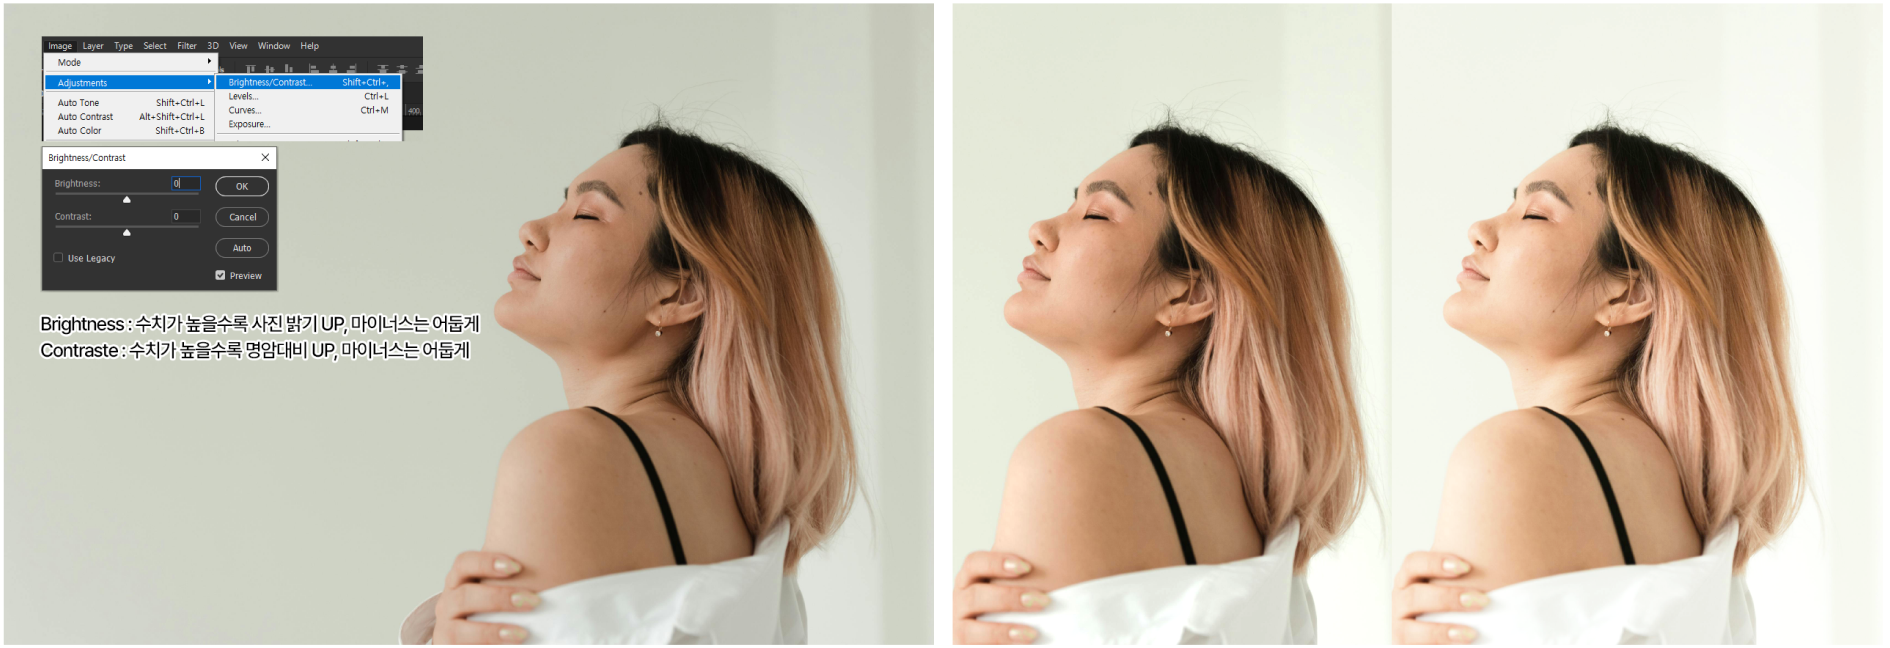
Color Correction – Vivid and Clear High Saturation
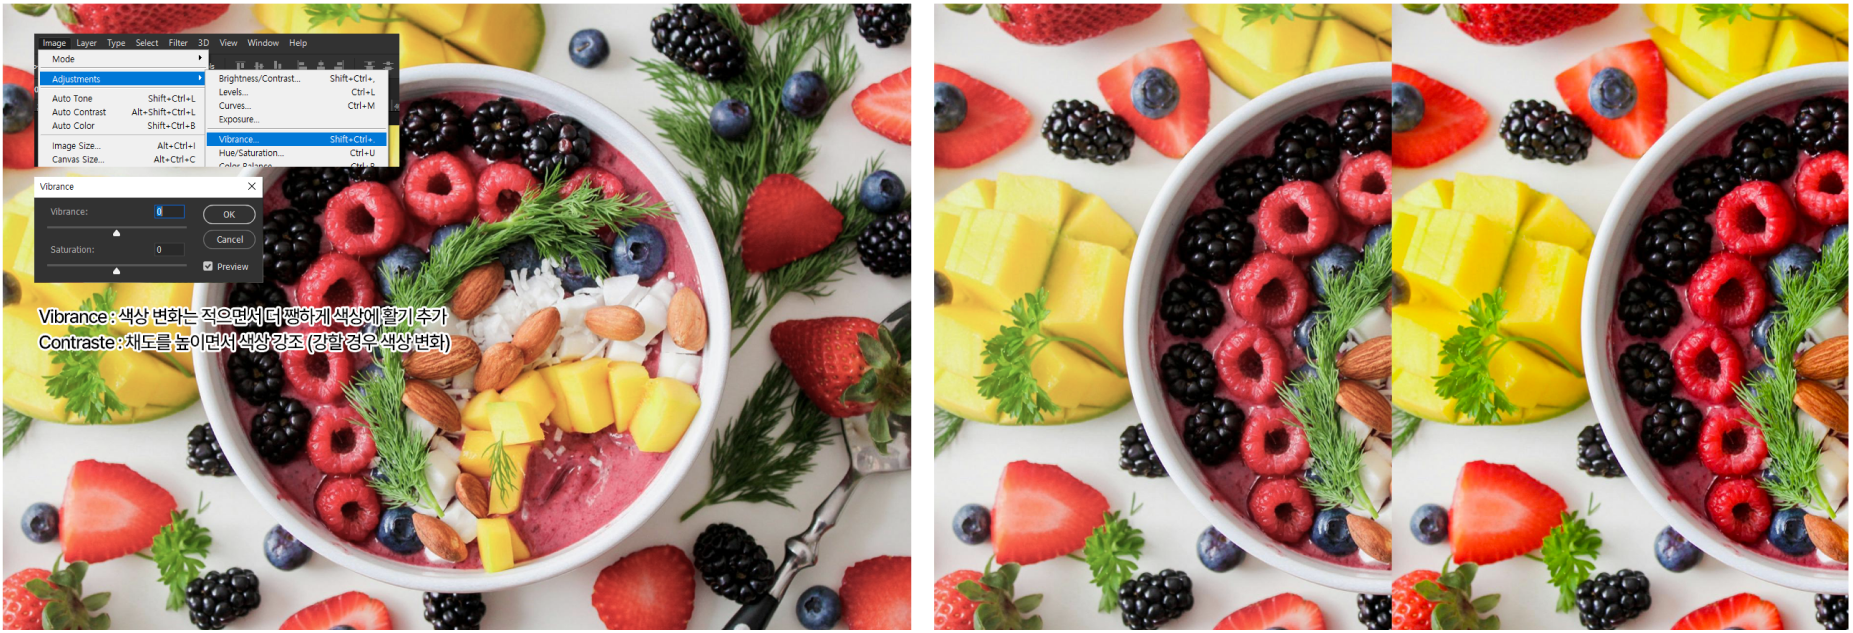
If you need vivid and distinct color representation, I recommend increasing the saturation. Also, when brightening a dark photo, the overall color tone can sometimes become washed out; in this case, slightly increasing the saturation can help restore the original colors.
If you’re aiming for a somewhat moody and dreamy look rather than a vibrant photo, you might want to try adjusting the colors to make them slightly muted. This is the editing style often referred to as the “Instagram aesthetic.” You can achieve a similar look by significantly lowering both saturation and contrast.
Camera Raw filter – Color Temperature, presets, Black Tone Down (instead of Curves), one-click editing (like Lightroom)
So, how do you adjust the tone? Adjusting exposure, brightness, contrast, and saturation is the most basic approach.Let me explain usingPhotoshop’sCamera Raw filter. If you’ve used Lightroom or video editing software before, this interface will be familiar to you. Most of the features described earlier can be adjusted within this interface. However, since exposure is adjusted globally rather than via the exposure meter, it’s best to adjust exposure first if you need detailed corrections.
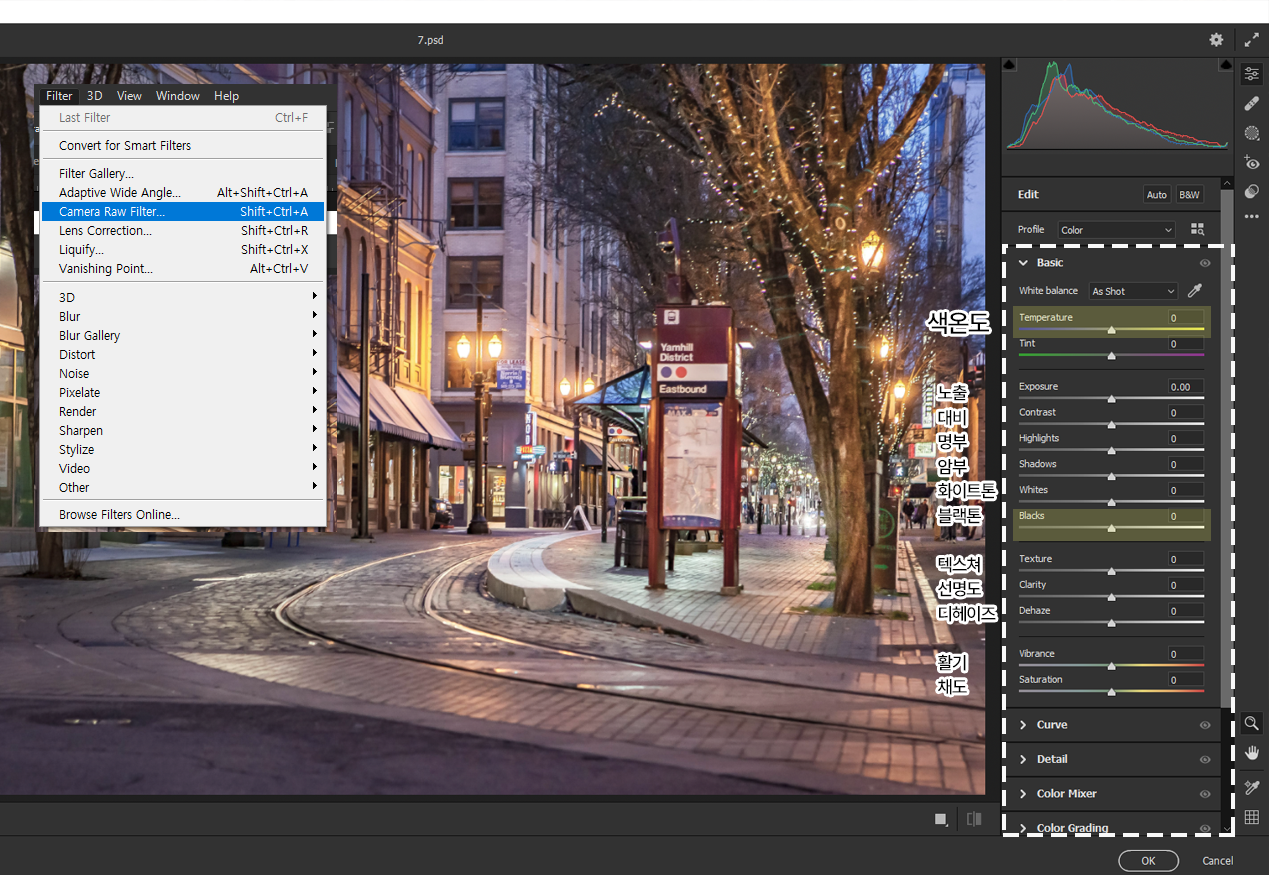
If you’ve already adjusted the exposure, brightness, contrast, and saturation and have arrived at this screen, it’s usually sufficient to make only a few additional adjustments to the color temperature and black tones. Color temperature is particularly useful when the photo’s tone changes due to indoor lighting. Alternatively, you can intentionally alter the color temperature to change the mood of the image.
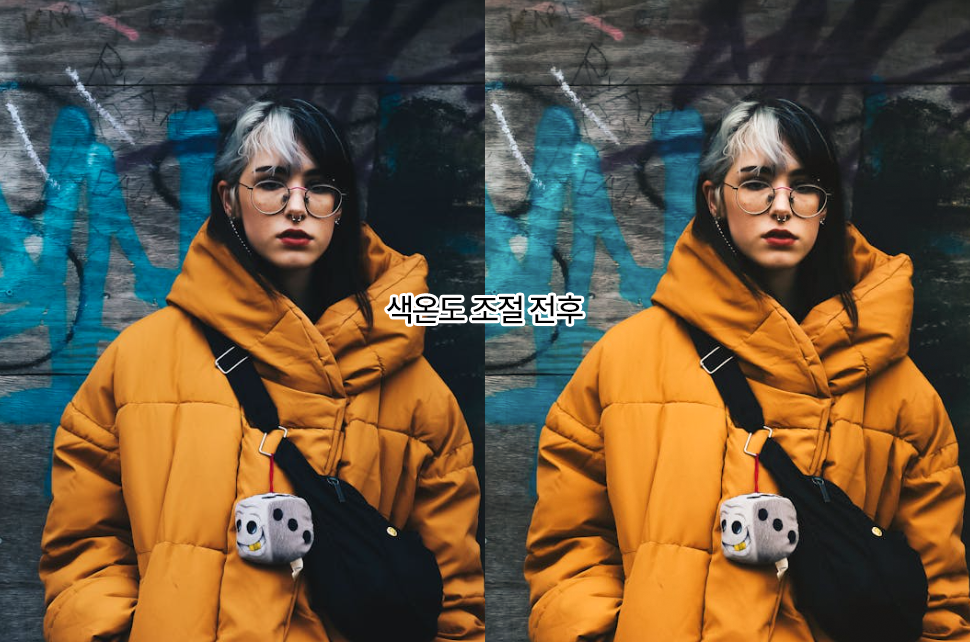
Black tone correction is the setting that determines the final quality of your photo. If there are black or near-black colors in the image, increasing the brightness can sometimes cause these tones to turn gray. (Curves are typically used to prevent this.) When you adjust the entire photo, if the black tones become too bright, it can make the image appear less sharp; therefore,by readjusting the black tones hereto restore them to their proper levels, you can enhance the overall quality of the photo.
Basic Detail Correction
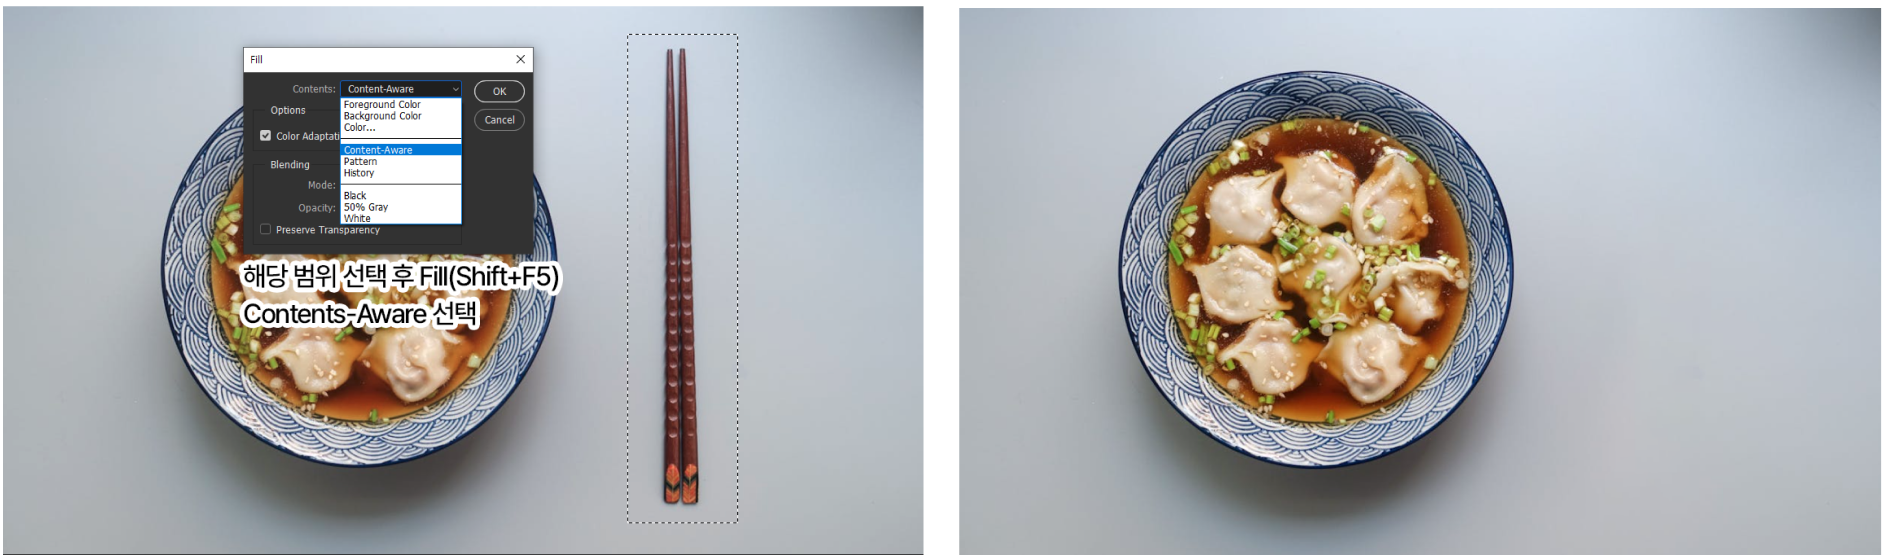
Finally, there’s basic detail correction. The Content-Aware feature automatically recognizes surrounding pixels to fill in the area. This feature has recently become widely known as the “AI fill” function on smartphones. Itallows you to easily remove unwanted objects or blemishes from a photo and fill in empty backgrounds with similar-looking pixels when you zoom in. Of course, it’s not perfect, so it’s best to use it on photos where the selection area is simple and there are plenty of surrounding pixels to draw from.
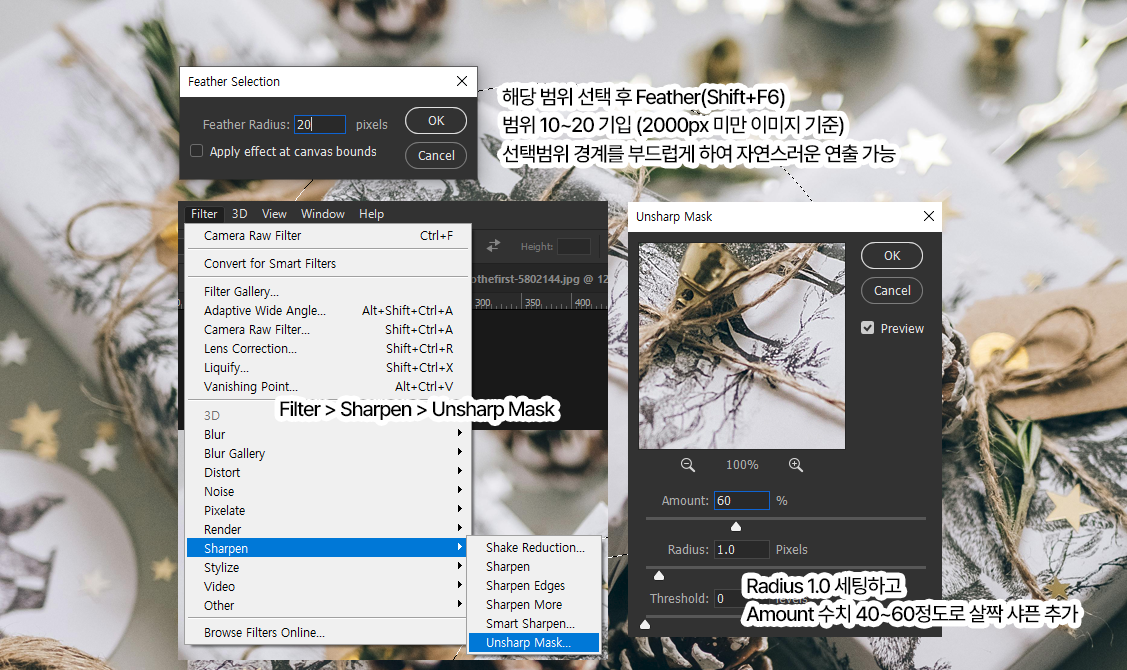
Sharpen and Blur are, as the names suggest, features that make an image sharper or blurrier. While Blur isn’t often used when editing product photos,Sharpen can sometimes serve a role similar to sesame oil added at the very end of a dish. (Of course, just like sesame oil, there are many times when it’s best not to add it.) You can apply sharpening to the entire photo to make it look crisp, or, in the case of photos with a shallow depth of field, apply it to specific areas where the viewer’s gaze is most likely to land first to make those areas appear sharper.
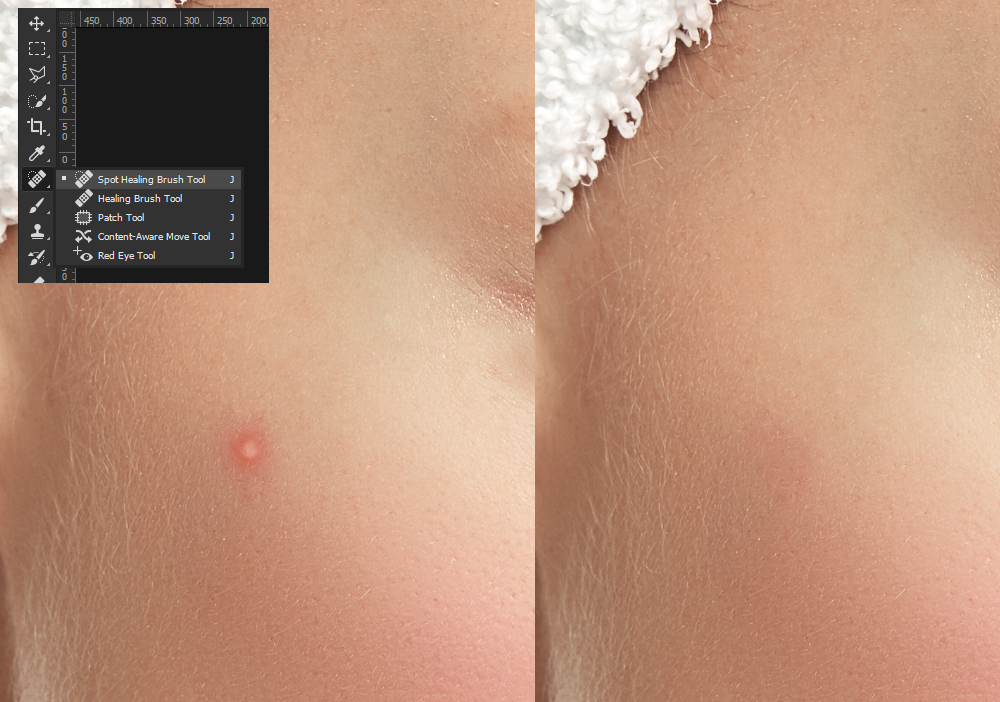
The Spot Healing Brush is a feature that lets you use the “Content-Aware” technology mentioned earlier like a brush. Just like applying concealer, you can tap it directly on blemishes to easily remove them.
Of course, there’s no single “right” answer when it comes to photo editing. Even photos taken on the same day under the same conditions may require different adjustments, and the necessary editing methods can vary depending on the photo itself. However, I’m confident that this level of basic editing is sufficient for creating images suitable for commercial use.
<Product Photography Tips for Detail Pages> Series
- [Product Photography Tips for Detail Pages #1] How to Take Professional-Looking Photos with a Smartphone
- [Product Photography Tip #2 for Product Detail Pages] How to Take Product Photos Using Only a Smartphone
- [Product Photography Tip #3 for Product Detail Pages] Photo Editing Techniques That Make People Stop Scrolling

Written by Jeon Su-yeon, GenieCloud Editor